As the holiday season fills the air with joy and warmth, I want to take a moment to wish you and your loved ones a truly wonderful Christmas. May your days be filled with laughter, love, and cherished moments that become lifelong memories.
This is a season to celebrate the beauty of togetherness, the joy of giving, and the magic of hope. Whether you’re surrounded by family, friends, or simply the quiet comfort of reflection, I hope your heart feels full and your spirit renewed.
Thank you for being part of my life—it’s a gift I treasure more than words can say. Here’s to a holiday filled with peace, happiness, and the special kind of magic that only Christmas can bring.
I always tackle all my food prep for the holiday in one go on the day before, so everything is ready to roll when the day arrives. There’s something so nice about having dinner simmering away in the crockpot while you’re busy with all the holiday cooking prep! Knowing a warm, hearty meal is already taken care of makes the food prep feel a little more stress-free! This comforting slow-cooker soup features Italian sausage, tomatoes, cheese tortellini, spinach, and a touch of cream for a hearty and satisfying meal. It tastes even better the next day served as leftovers.
3/4 cup heavy cream (optional, but i definitely recommend it!)
2 cups packed fresh baby spinach
Salt and pepper, to taste
Instructions
Cook Sausage and Onions: Heat a skillet over medium heat. Add the sausage and onion, cooking for 7–8 minutes while breaking up the sausage with a spoon. Cook until browned, then drain excess fat if needed.
Add Garlic: Stir in the minced garlic and cook for 30 seconds, until fragrant. Transfer the sausage mixture to the Crockpot.
Add Vegetables and Broth: Add the carrots, celery, crushed tomatoes, diced tomatoes, and chicken broth to the Crockpot.
For a quick cook (3–4 hours on high), finely chop the carrots.
For a longer cook (7–8 hours on low or 4–5 hours on high), chop the carrots into larger pieces.
Add Tortellini and Cream: About 30 minutes before serving, add the tortellini, spinach, and heavy cream (if using). Stir occasionally and set the Crockpot to “high” if it isn’t already.
Season and Serve: Season with salt and pepper to taste. Serve immediately while the tortellini is tender. Serve with crusty bread or ritz crackers.
Notes
Use ground sausage or remove the meat from sausage casings. Spicy sausage adds a nice kick!
This soup is best fresh, as the tortellini can absorb the broth over time (Personally, I like it like that, but some people may not). Add extra chicken broth when reheating or cook the tortellini fresh if you plan on having leftovers.
A 7-quart Crockpot is ideal for this recipe, as the tortellini will nearly fill the pot.
Enjoy this hearty, flavorful soup that’s perfect for busy days or chilly nights!
I remember as a child a classmate would bring homemade Saltine Cracker Toffee to our class parties and special occasions. The combination of the crispy crackers, rich caramel, and smooth chocolate was irresistible, especially since caramel has always been a favorite of mine.
This easy and irresistible treat combines crunchy saltine crackers with rich toffee, melted chocolate. Perfect for sharing at a holiday get together or gifting in festive tins during the holidays!
1 bag (11.5 oz) milk chocolate chips (about 2 cups)
1 tablespoon candy sprinkles
Instructions
Step 1: Preheat your oven to 350°F (175°C). Line a 15x10x1-inch baking pan with aluminum foil and coat the foil with cooking spray. Arrange the saltine crackers in a single layer on the pan.
Step 2: In a 2-quart saucepan, melt the butter over medium heat. Add the sugar and salt, stirring frequently until the mixture reaches a boil. Continue boiling for 7 to 9 minutes, stirring often, until the mixture turns a light brown color. Remove from heat and stir in the vanilla extract. Immediately pour the toffee mixture over the crackers, spreading it evenly.
Step 3: Bake for 13 to 15 minutes, or until the toffee is bubbly and golden brown. Remove the pan from the oven and sprinkle the chocolate chips over the top. Let them sit for 5 minutes to soften, then spread the melted chocolate evenly over the toffee. Top with candy sprinkles.
Step 4: Allow the toffee to cool completely at room temperature, about 2 hours, or until the chocolate is firm. Break into pieces and enjoy. Store in an airtight container in the refrigerator for up to 1 week.
Variation Idea: For a delicious twist, substitute the saltines with graham crackers, use packed dark brown sugar instead of granulated sugar, skip the chocolate chips, and sprinkle with chopped pecans instead
Smooth, creamy, and irresistible—this is the ultimate treat for special occasions! I discovered this recipe years ago and first made it for a church function, it was a crowd pleaser. Having a sweet tooth, I instantly fell in love with how rich and creamy it was! Since then, I’ve made it many times, and it’s always a hit. This drink is so indulgent it can even double as a dessert. If you prefer, you can use decaf coffee to make it.Make your punch bowl look extra festive by drizzling chocolate and or caramel syrup along the inside before adding the coffee punch.
1 (2-ounce) jar instant coffee granules (e.g., Nescafe®)
1 gallon 2% milk
½ gallon vanilla ice cream
½ gallon chocolate ice cream
Instructions
Prepare the Coffee Base In a large bowl, combine the boiling water, sugar, and instant coffee granules. Stir until the sugar and coffee are fully dissolved. Refrigerate for at least 30 minutes or up to overnight to chill.
Assemble the Punch Transfer the chilled coffee mixture to a large punch bowl. Add the milk, vanilla ice cream, and chocolate ice cream.
Mix and Serve Gently stir the punch until the ice cream starts to melt, creating a creamy and frothy consistency. Serve immediately.
Enjoy this crowd-pleasing, indulgent coffee punch at your next gathering!
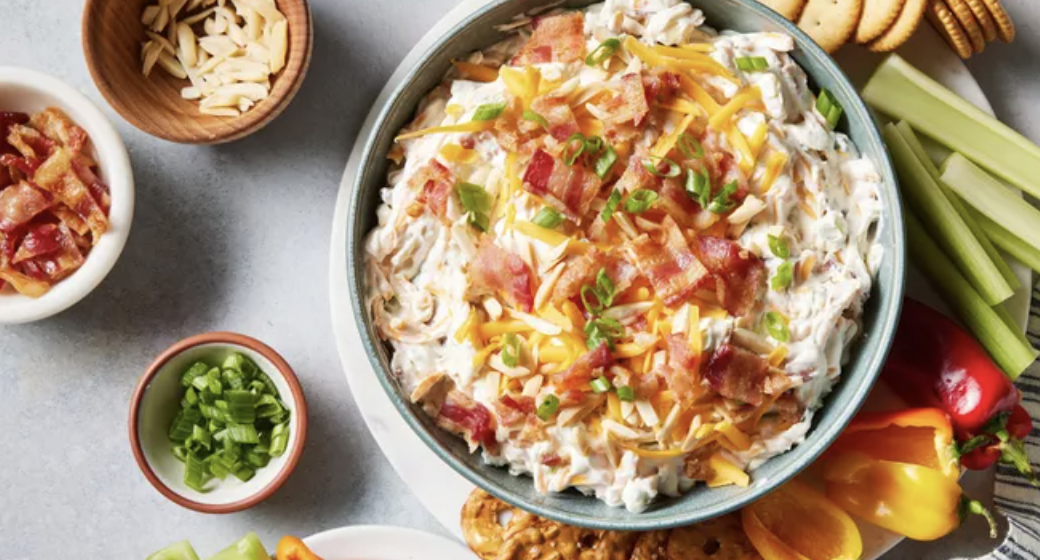
Last Christmas, my mother-in-law served this Million Dollar Dip, and it was an instant hit. My kids loved it so much that they not only ate a ton of it on Christmas day, they now ask me to make it regularly. It has quickly become a favorite! The original recipe is from Better Homes and Gardens.
Prepare the Creamy Base In a large mixing bowl, beat the softened cream cheese on low speed until smooth. Add the sour cream, mayonnaise, garlic powder, and onion powder, and continue mixing until well combined.
Incorporate the Mix-Ins Reserve 1–2 tablespoons each of bacon, green onions, and almonds for garnish. Add the remaining bacon, green onions, almonds, and shredded cheddar cheese to the creamy mixture. Stir until everything is evenly distributed.
Toast the Almonds (Optional) To toast the almonds, heat a dry skillet over medium heat. Add the slivered almonds and cook for 5–7 minutes, stirring frequently, until they turn golden brown and release a nutty aroma.
Finish and Serve Transfer the dip to a serving dish and sprinkle the reserved bacon, green onions, and almonds on top for added texture and flavor. Serve with crackers, corn chips, pretzel chips or cut up veggies.
Storage Tips Store leftover dip in an airtight container in the refrigerator for up to 3 days. Freezing is not recommended, as it may alter the dip’s texture.
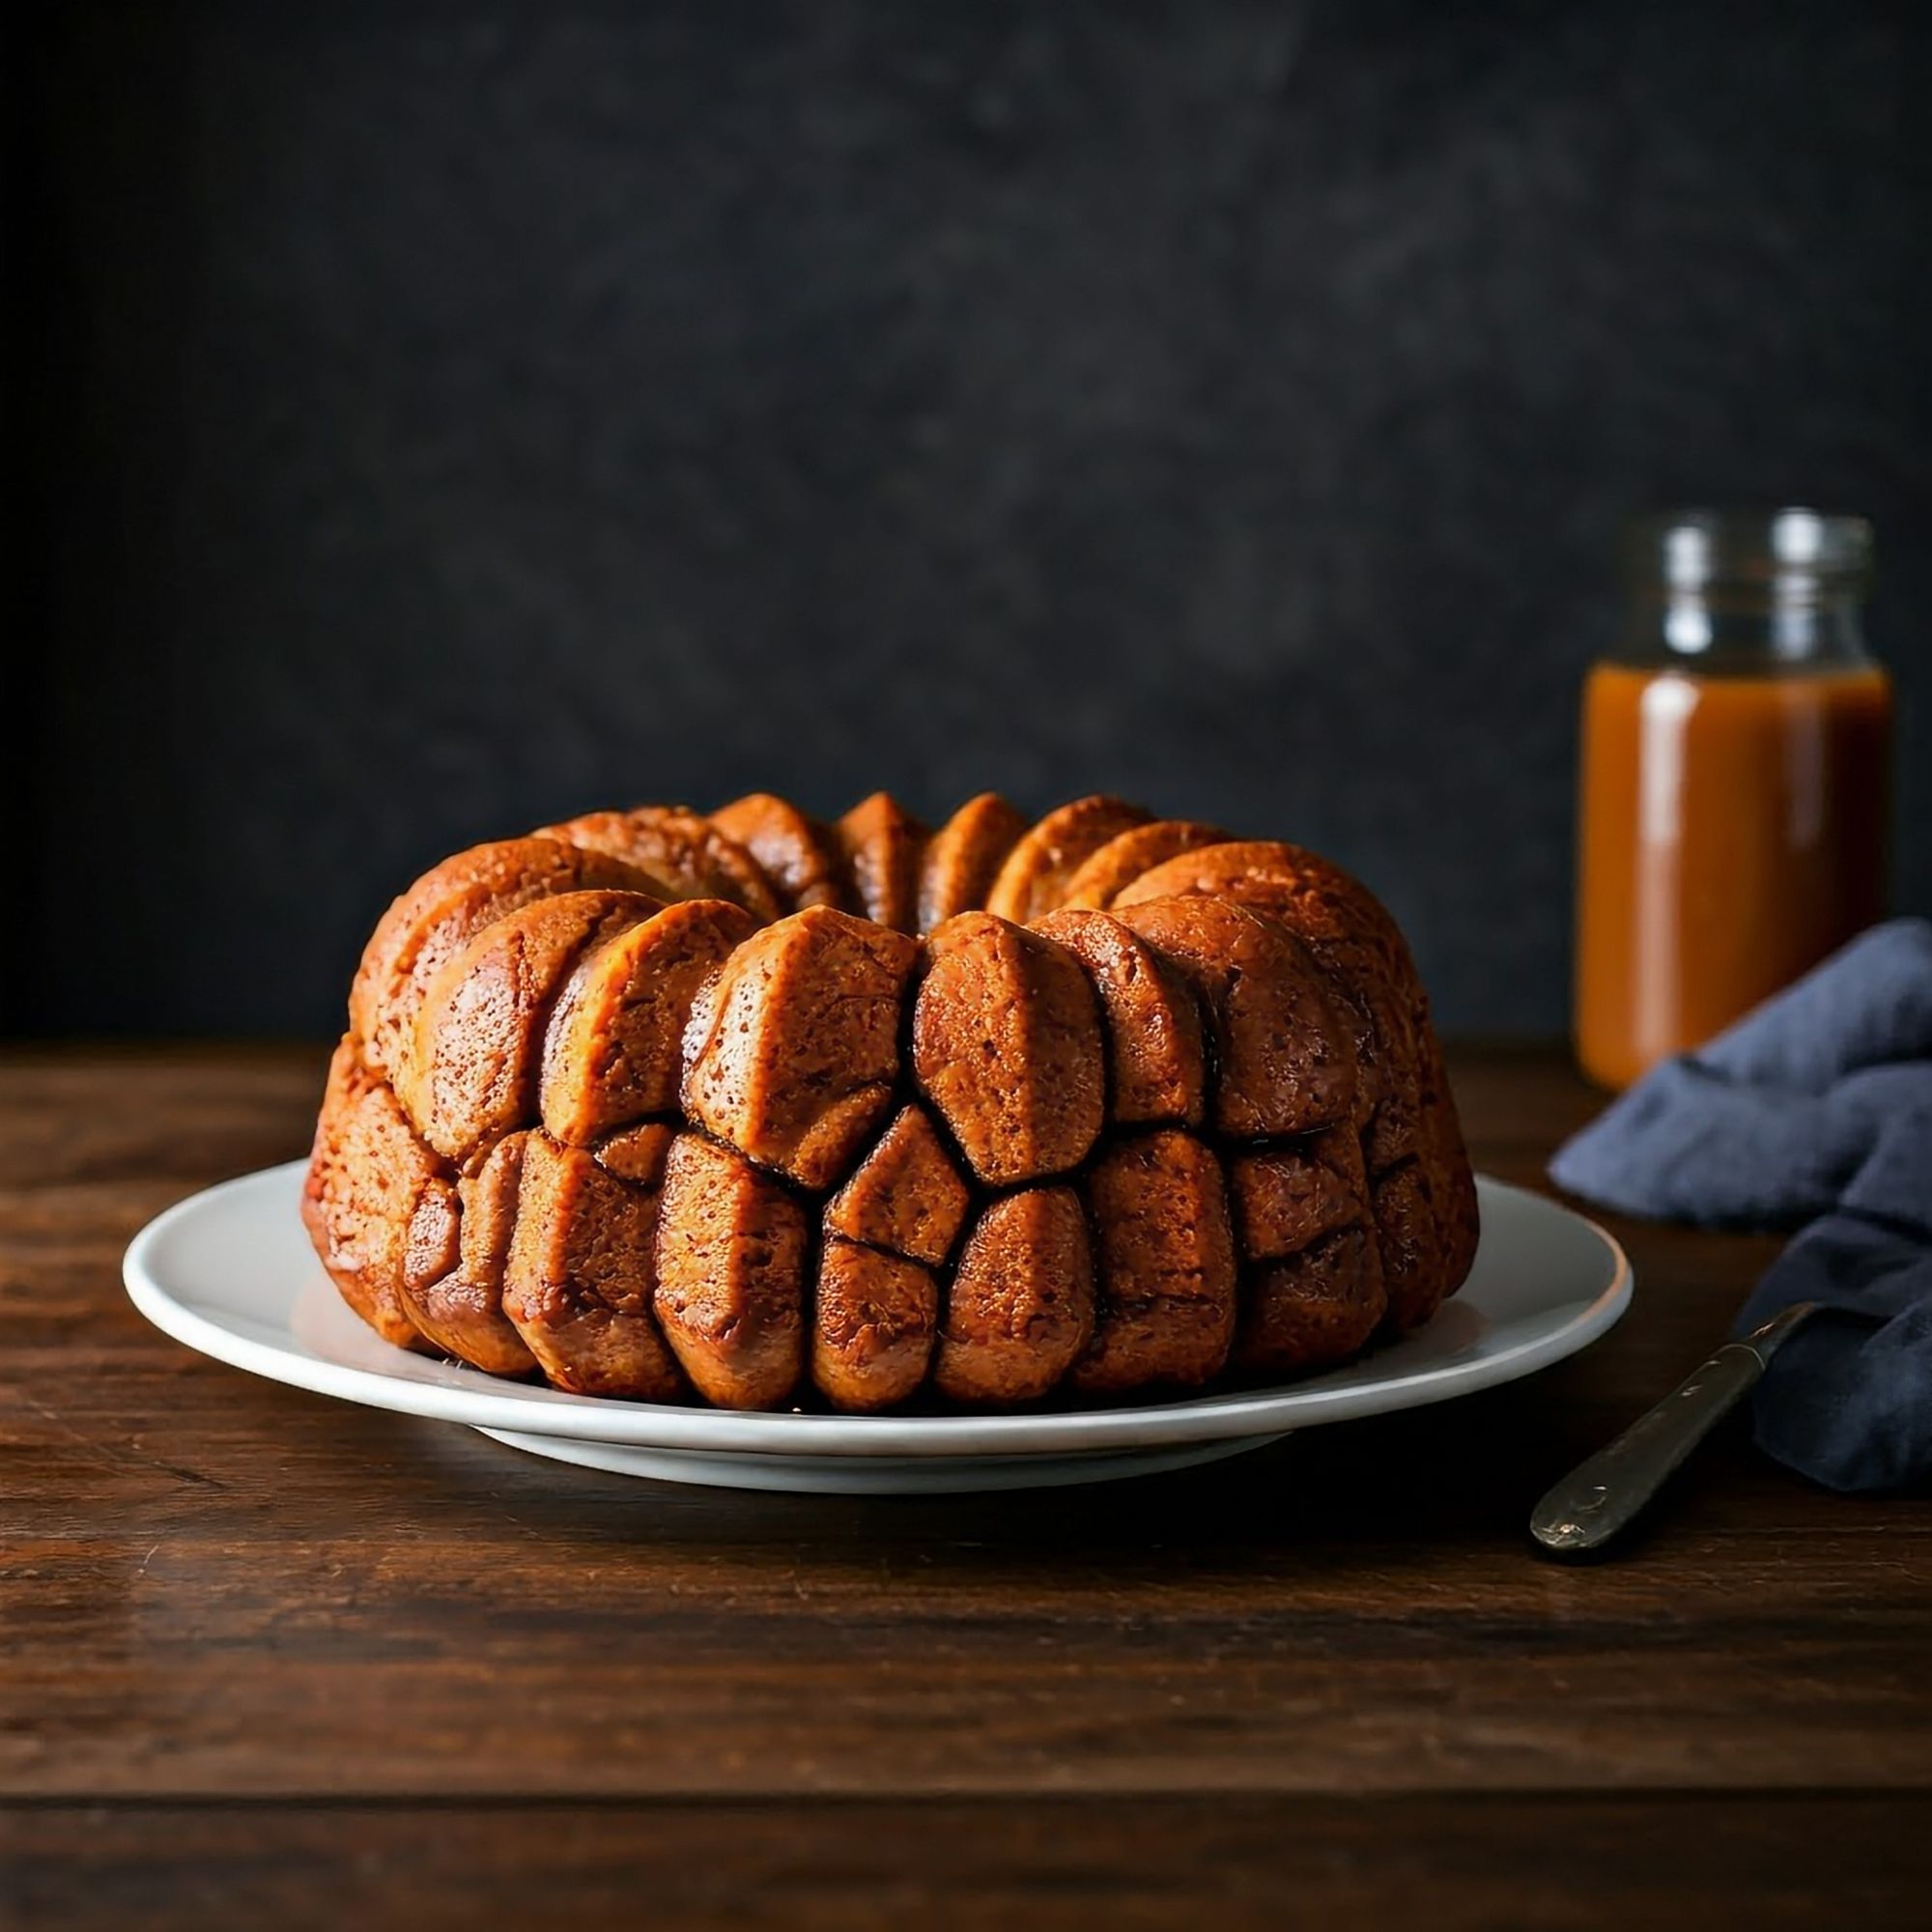
This easy Monkey Bread is a delicious, pull-apart treat that combines the sweetness of cinnamon and sugar with buttery biscuit dough. This monkey bread is perfect for breakfast, brunch, or as a sweet snack, and it’s sure to be a hit with everyone! Here’s how to make it using Pillsbury refrigerated biscuits.
Ingredients
1/2 cup granulated sugar
1 teaspoon ground cinnamon
2 cans (16.3 oz each) refrigerated Pillsbury™ Grands!™ Flaky Layers Original Biscuits (8 count)
3/4 cup packed brown sugar
1/2 cup butter or margarine, melted
Instructions
Preheat the Oven: Preheat your oven to 350°F (175°C). Generously grease a 12-cup fluted tube pan (Bundt pan) with cooking spray.
Prepare the Cinnamon Sugar: In a large plastic food storage bag, combine the granulated sugar and ground cinnamon.
Cut the Biscuits: Separate the biscuit dough into individual biscuits. Cut each biscuit into quarters.
Coat the Biscuit Pieces: Add the quartered biscuit pieces to the bag with the cinnamon sugar mixture. Seal the bag and shake until all pieces are well coated.
Layer in the Pan: Arrange the coated biscuit pieces in the prepared pan, layering them evenly.
Make the Butter and Brown Sugar Mixture: In a small bowl, mix together the melted butter and packed brown sugar until well combined. Pour this mixture evenly over the biscuit pieces in the pan.
Bake: Bake in the preheated oven for 30 to 40 minutes or until golden brown and no longer doughy in the center.
Cool and Serve: Allow the monkey bread to cool in the pan for about 5 minutes. Carefully invert it onto a heatproof plate or serving platter. Serve warm, pulling apart pieces to enjoy!
Several years ago, I had a version of these cookies while my sister-in-law’s mother was visiting for Christmas. They left such an impression that I’ve thought about them often ever since. Recently, I decided to track down the recipe and give it a try.
Trust me, if you make these Ooey Gooey Butter Cookies, you’re going to have a hard time resisting them. They’re soft, chewy, and bursting with a rich buttery flavor that makes them absolutely irresistible. Perfect for any occasion, they’re the kind of treat that disappears as soon as they hit the plate.
I found this recipe on the Betty Crocker site and wanted to share it with you. I’ve included the link to their recipe and video guide below—happy baking! And don’t say I didn’t warn you—they’re dangerously good!
Ingredients
1 package (8 oz) cream cheese, softened
½ cup unsalted butter, softened
1 egg
1 teaspoon vanilla extract
1 box Betty Crocker™ Super Moist™ Yellow Cake Mix
1-2 cups powdered sugar (for rolling)
Instructions
Preheat the Oven: Heat your oven to 350°F (175°C).
Mix Wet Ingredients: In a large mixing bowl, combine the softened cream cheese and butter. Use an electric mixer to beat until smooth. Then add the egg and vanilla extract, mixing until well blended.
Add Cake Mix: Gradually stir in the yellow cake mix until fully combined. The dough will be thick and slightly sticky.
Chill the Dough: Cover the bowl with plastic wrap and refrigerate the dough for at least 30 minutes. This step makes it easier to handle.
Form Cookie Balls: Once chilled, scoop out small portions of the dough and roll them into balls about 1 inch in diameter.
Coat in Powdered Sugar: Roll each ball in powdered sugar until fully coated.
Bake: Place the cookie balls on ungreased cookie sheets, spaced about 1 inch apart. Bake for 9 to 11 minutes or until the edges are set but the centers remain soft.
Cool and Serve: Allow the cookies to cool on the baking sheet for about 2 minutes before transferring them to a wire rack to cool completely. Optionally, you can sprinkle more powdered sugar on top before serving.
Tips
For variations, consider using different cake mixes like chocolate or lemon.
Ensure all ingredients are at room temperature for better mixing.
Store leftover cookies in an airtight container at room temperature for up to three days (there is no way these cookies are still going to be around three days later. 😉)
Enjoy these delicious gooey butter cookies that are sure to be a hit with family and friends!
Looking for a crowd-pleasing appetizer that’s not only delicious but easy to make? Look no further than this Cheesy Bacon Pull-Apart Bread. This cheesy, buttery, and bacon-filled bread is the perfect party starter. It’s simple to assemble and always a hit with guests.
Ingredients:
1 loaf French bread
1 cup shredded cheddar cheese
1/2 cup shredded mozzarella cheese
1/4 cup chopped green onions
4 slices bacon, cooked and crumbled
1/4 cup butter, melted
1 teaspoon garlic powder
1/2 teaspoon Italian seasoning
Instructions:
Preheat oven to 350°F (175°C).
Slice the bread: Slice the French bread horizontally into 1-inch thick slices, leaving the bottom crust intact.
Fill the slices: Fill the slices with a mixture of cheddar cheese, mozzarella cheese, green onions, and bacon.
Combine butter and seasonings: In a small bowl, combine melted butter, garlic powder, and Italian seasoning.
Brush the bread: Brush the top of each slice with the butter mixture.
Bake: Bake for 20-25 minutes, or until the cheese is melted and bubbly.
Serve: Serve immediately.
Tip: For extra flavor, add a drizzle of hot sauce or a sprinkle of red pepper flakes to the cheese mixture.
I’m in the mood for holiday food. Over the next few days I am going to be sharing some holiday recipes. I love gingerbread cookies! These classic gingerbread cookies are perfect for decorating and gifting during the holidays.
Ingredients:
1 cup (2 sticks) unsalted butter, softened
1 cup granulated sugar
1/2 cup packed light brown sugar
1 large egg
1/4 cup molasses
3 1/2 cups all-purpose flour
1 teaspoon baking soda
1 teaspoon ground ginger
1 teaspoon ground cinnamon
1/2 teaspoon ground cloves
1/4 teaspoon salt
Royal icing (for decorating)
Instructions:
Preheat oven to 375°F (190°C). Line baking sheets with parchment paper or foil.
Cream butter and sugars: In a large bowl, cream together the butter and sugars until light and fluffy. Beat in the egg, then stir in the molasses.
Combine dry ingredients: In a separate bowl, whisk together the flour, baking soda, ginger, cinnamon, cloves, and salt. Gradually add the dry ingredients to the wet ingredients, mixing until1 just combined.
Roll and cut: Roll out the dough on a lightly floured surface to 1/4-inch thickness. Cut out shapes using cookie cutters.
Bake: Place the cookies on the prepared baking sheets. Bake for 8-10 minutes, or until the edges are lightly browned. Let cool on the baking sheets for a few minutes before transferring to a wire rack to cool completely.
Decorate: Once cooled, decorate the cookies with royal icing and sprinkles.
Royal Icing:
3 cups powdered sugar
2-3 tablespoons meringue powder*
1 teaspoon vanilla extract
5-6 tablespoons water
Combine all ingredients in a bowl and beat with a mixer until smooth and spreadable.
*If you need a substitute for meringue powder, you can use an equal amount of reconstituted egg white powder mixed with water, a slightly smaller amount of aquafaba (the liquid from a can of chickpeas), or a gelatin mixture made with warm water and gelatin powder – just be sure to adjust the liquid content accordingly depending on the substitute you choose.
Enjoy these festive treats with a cup of hot cocoa, glass of milk, coffee, or tea!
Thankfulness is more than just saying “thank you” or “I am thankful.” It’s a way of seeing the world that can change how we experience life. I’ve come to realize that being thankful isn’t just something you do when things are going well—it’s a practice that can bring peace and perspective even when life feels hard and heavy. Gratitude is about pausing to appreciate what you have, the people around you, and even the lessons hidden in the difficulties and challenges. It’s not always easy, but it’s always important.
For me, thankfulness often starts with the small things: the cozy warmth of my home, the sound of laughter from my kids, cuddling with my sweet dog, dinner time around the table with my family, or even the simple comfort of a quiet moment after a busy day. These aren’t extraordinary things, but they’re what make everyday life full and enjoyable. When I take time to notice them, I find myself feeling lighter, happier, and better able to face whatever’s ahead. Gratitude reminds me that joy doesn’t have to come from big achievements or perfect circumstances—it’s already right here, waiting to be noticed and appreciated.
I’ve learned that being thankful for the people in my life strengthens my connections with them. Whether it’s taking a moment to thank my kids for their kindness or letting a friend know how much their support means to me, gratitude deepens relationships. It helps me focus on what’s good about the people I care about instead of dwelling on little frustrations. And the more I express my gratitude, the more it seems to grow—like a habit that gets easier and more natural over time.
There have been moments in my life when gratitude felt far away—times when grief, stress, or disappointment seemed to overshadow everything else. But looking back, I’ve found that looking for something to be thankful for, no matter how small, makes a difference. It might be the kindness of a stranger, a supportive word from someone I trust, or just the reminder that hard times don’t last forever. Gratitude doesn’t erase pain, but it does give me something steady to hold onto. Being thankful can act as a light guiding me through the dark times.
Being thankful has taught me to slow down, to look for the good in my life and the people around me, and to trust that even hard moments have their place. It’s not always easy, and I don’t always get it right—but when I practice gratitude, life feels richer, and I feel more connected to what really matters.
So often, it’s easy to focus on what’s wrong or what’s missing. But when I choose to focus on what’s right, even in the smallest ways, I notice how much I already have. Thankfulness has become more than just a reaction to the good moments—it’s a way of living that makes every moment more meaningful.