Make up

Hooded Eyes Makeup Do’s and Don’ts by Sona Gasparian

I have slightly hooded eyes, I think it would actually be called a heavy fold.  My eye shape is actually very similar to hers. Due to this I can’t just do any type of makeup look that I want.  Certain strategies help to make a “hooded eye” look more open and awake.

I love Sona Gasparian‘s videos.  If you have never watched her before I definitely recommend you check her out! This video about Hooded Eyes Makeup  Do’s and Don’ts is such a great tutorial!  What a huge difference in the way her eyes look!

Delicious Recipes

Sweet Potato Casserole

I look forward to Thanksgiving every year for one reason.  It is not the turkey or the mashed potatoes.  It isn’t even the pies and desserts, although those are great too.  The reason I look forward to Thanksgiving is this awesome Sweet Potato Casserole!  It is so delicious!!!  We had a Thanksgiving feast this past Sunday with a group of our friends.  I made this dish to share with everyone and it was a crowd pleaser!

sweet-potato-casserole | lookingjoligood.wordpress.comIngredients

  • 4 cups sweet potato, cubed
  • 1/2 cup white sugar
  • 2 eggs, beaten
  • 1/2 tsp cinnamon
  • 1/2 teaspoon salt
  • 4 tablespoons butter, softened
  • 1/2 cup milk
  • 1/2 teaspoon vanilla extract
  • 1/2 cup packed brown sugar
  • 1/3 cup all-purpose flour
  • 3 tablespoons butter, softened
  • 1/2 cup chopped pecans

Directions

  1. Preheat oven to 325 degrees F (165 degrees C). Put sweet potatoes in a medium saucepan with water to cover. Cook over medium high heat until tender; drain and mash. (or use canned yams and skip this step all together.)
  2. In a large bowl, mix together the sweet potatoes, white sugar, eggs, cinnamon, salt, butter, milk and vanilla extract. Mix until smooth. Transfer to a 9×13 inch baking dish.
  3. In medium bowl, mix the brown sugar and flour. Cut in the butter until the mixture is coarse. Stir in the pecans. Sprinkle the mixture over the sweet potato mixture.
  4. Bake in the preheated oven 30 minutes, or until the topping is lightly brown.
Health/ Fitness

Essential Oils

Unless you have been living under a rock :-), (or maybe you don’t have a Facebook or Pinterest account), I am sure you have heard one thing or another about essential oils.  I have been using essential oils for about 2 years now. Don’t stop reading, I am NOT a Youngliving or Doterra sales rep, and I am not going to try to get anyone to buy something from me.  I just love using essential oils.  There are so many natural benefits to using these oils!  As you may know, I am an RN, I give modern medicine on a daily basis.  I believe in modern medication, but I also believe that essential oils are beneficial as well.

You may have heard the term essential oils, but might still be wondering what are essential oils?Well if you were to google “what are essential oils?”  the first answer you would get would be “a natural oil typically obtained by distillation and having the characteristic fragrance of the plant or other source from which it is extracted.”  Basically that means an oil that comes from a plant or other natural source.

Essential Oils | lookingjoligood.com
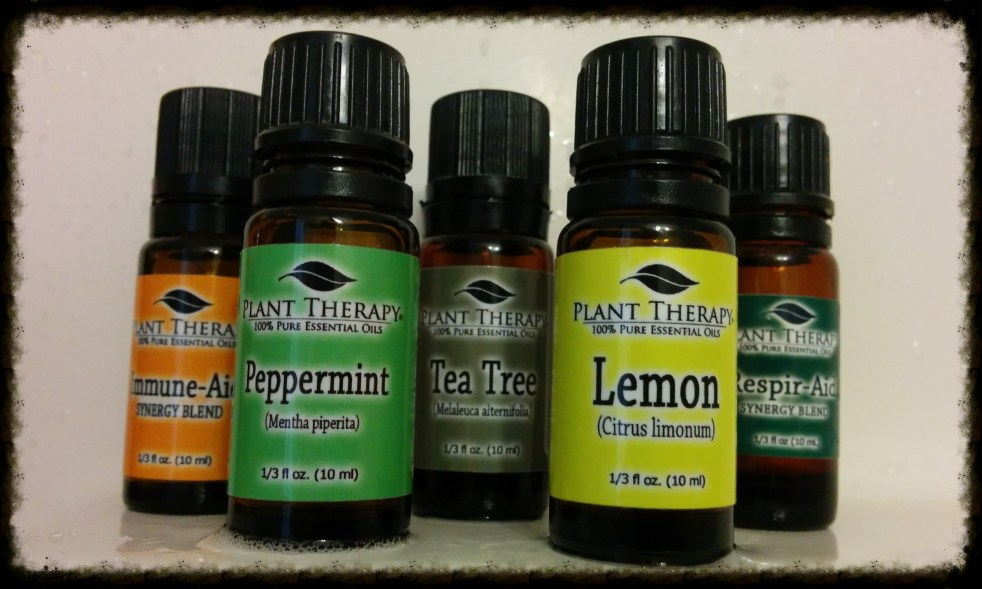
I like to get a lot of my oils from Plant Therapy, but I have also used some YoungLiving and Now oils.  Some of my most favorite oils to use are Lemon, Peppermint, and Lavender oil.  I like to combine the three of them for an allergy fighting trio. Pinterest has many different ideas on how you can use essential oils. (Click HERE to follow my Essential Oils board)

Generally, essential oils are either inhaled through the use of a diffuser or applied topically.  I have a GreenAir SpaVapor diffuser that I bought on sale from Amazon for $25.  Every night, I diffuse essential oils for respiratory relief in my daughter’s room, and I really feel as if this helps with her asthma.

If you are going to be applying your oil topically, you need to cut it with a carrier oil.  A carrier oil is a vegetable oil such as coconut oil, olive oil, my favorite grapeseed oil.   These oils can be used to dilute essential oils.  A 2% essential oil dilution is generally considered safe for topical application of essential oils on adults. To make a 2% dilution add 12 drops of essential oil to each fl. ounce (30 ml) of carrier oil. (Usually 600 drops of essential oil equals 30ml or 1 fl. ounce, so 2% is 12 drops)  Some oils are more potent than others, but a 2% dilution is the usual recommendation. I’ll be honest, sometimes when diluting my oils, if I am familiar with my body’s reaction to the oil, I put a lot more than 12 drops when I am diluting them.  But if you are new or still getting used to essential oils, less is more until you know what works for you.  Also, if I am mixing more than one oil together, I personally do 12 drops of each oil to one fl oz total.  I don’t add an extra fl oz of carrier for each oil, some may, but I personally usually don’t.

If you choose to ingest essential oils, before doing so, be absolutely sure that they are food grade oils.  Personally, I would never ingest any essential oils, but that is my choice due to research that I have done.

Check out Using Essential Oils Safely. Essential oils are awesome when used properly, but like a lot of things, can be toxic when overused or used improperly.  Also, if you have a lot of questions, Youngliving’s website has a great Q&A section!

**There are no affiliate links in this post.  This is all my own opinion.  I am not getting paid for sharing any of this information!**

lookingjoligood.wordpress.com

Beauty Subscription · Make up

Ipsy Glam Bag November 2015

I can’t believe that another month has flown by and it is already time to receive another ipsy glam bag!  If you don’t know what ipsy is you can check out my previous post all about it by clicking HERE

If you are thinking about trying out ipsy, here is my referral link  https://www.ipsy.com/new?refer=uqdkx

This month’s glam bag is a “universe of brilliant beauties.”  This month in my glam bag I received…

November Ipsy Glam bag | lookingjoligood.wordpress.comCrown Brush Deluxe Pointed Crease Brush

Luxie Beauty Matte Eyeshadow Pan No. 290 Aubergine  It is a beautiful eggplant color  perfect for in the crease.  Maybe I will use the Crown Brush to apply it.

Figs & Rouge Mattifying Emulsion & Pore Refiner

Smashbox Cosmetics Full Exposure Mascara  I have already used this a few times.  I was pretty excited about getting it in my glam bag, but after using it, I am only meh about it.  You know how some mascaras can get better after a little while, so I will keep using it and see if I like it more after a week or so.

ModelCo HIGHLIGHTING TRIO  This highlighting trio is very smooth and creamy.  I think that I will probably use it on my eyes instead.

Overall I am really pleased with this month’s glam bag. I prefer to get makeup instead of nail polish or skincare.

November Ipsy Glam bag | lookingjoligood.wordpress.com

How about you?   Did you get an ipsy’s glam bag?  What did you get in yours?  Were you happy with your samples?  Do you get any other monthly subscription bags/boxes that are worth trying out?  Let me know in the comments below.

If you don’t already subscribe and would like to try out ipsy you can use my referral link by clicking HERE!  Also, if you are interested in seeing my other recent posts about ipsy click HERE

Fashion/Style

Be Social With Me!

Good Morning!  Just like most people, I love Fridays! I hope that you are having a wonderful day so far.  I really appreciate you following my blog, and would love for you to follow me in other places as well.  Click below to open the social media of your choice…

Please, leave me a comment if you do follow me so that I can also follow you as well!

Pinterest: Joli Good

Instagram: lookingjoligood

Polyvore: laurjoli

Bloglovin: Looking Joli Good

Twitter: @JoliGoodFlowers

social-media | lookingjoligood.wordpress.om

Weekly Product Highlight

I Think I Am In Love With Coffee

~Weekly Product Highlight~

While this isn’t my usual type of makeup Weekly Product Highlight  it is a product I love and I want to highlight it 🙂

Aero Press Coffee Maker | lookingjoligood.wordpress.com
My Aero Press Coffee Maker

Are you a coffee drinker?  Up until about 6 months ago, I would have said “Not me, no way, I never drink coffee!”  Then I slowly started to drink coffee and it has all been down hill since then, haha, just kidding.  I do enjoy drinking coffee now.  I am not one to go to a drive-thru, so I needed to learn how to make my own coffee.  I also didn’t want to get another appliance to take up room on my already limited kitchen counter space.

My husband suggested that I try out an Aero Press.   I am not going to lie, I made several really bad cups of coffee before figuring out what worked best for my taste, after some trial and error, I have been loving my new coffee maker.

While I don't think that it really tastes like white chocolate or peppermint, this @DunkinDonuts coffee is very good!!!! lookingjoligood.wordpress.com
While I don’t think that it really tastes like white chocolate or peppermint, this Dunkin Donuts coffee is very good!!!!

If you don’t have a coffee maker already I definitely recommend this one.  It takes up minimal space and is very easy to use.  I have found that using a finely ground coffee works best, as well as adding a pinch of salt takes away the natural bitterness of some coffees. I like my coffee super strong, so I weigh out 26 grams of coffee grounds, then cover them with 185 degree water.  I swirl the water/coffee ground mixture for 15 seconds.  I then add 185 degree water up to almost the top of the press and let it rest for 45 seconds.  During this time I put the filter into the cap and wet the filter with the 185 degree water.  Once the 45 seconds is up, I put the cap on, flip the press over onto the top of my mug and slowly but consistently press the coffee out.  When a rush of air is heard, that means that the good part of the coffee is in the mug.  Discard the grounds and enjoy your cup of coffee.  (I add 185 degree water to my mug to make a full 8 oz of coffee.)

While I got mine from Amazon, they can also be bought at Crate and Barrel and Kohls as well as other places that sell home goods.

Here is what Amazon has to say about the Product Description

Fast and convenient, the AeroPress Coffee and Espresso Maker makes one of the best cups of coffee you’ll ever taste. This innovative uses the ideal water temperature and gentle air pressure brewing to produce coffee and espresso that has rich flavor with lower acidity and without bitterness. It makes 1 to 4 cups of coffee or espresso (enough for 1 or 2 mugs), features a micro filtered for grit free coffee, and takes just 1 minute to make coffee (actualpress time takes only 20 seconds).

To brew a double espresso or 10-ounce cup of coffee:

  • Place a microfilter in the bottom cap of the AeroPress chamber and twist the cap tightly closed.
  • Place two scoops of ground coffee from the included AeroPress scoop into the chamber.
  • Stand the chamber on a sturdy mug, then proceed to pour hot water into the top of the chamber (175 degrees F is optimal).
  • Stir the water and coffee with the included paddle for about 10 seconds.
  • Insert the plunger into the chamber and gently press down about a quarter of an inch and continue to maintain that pressure for 20 to 30 seconds (gentle pressure is the key to easy AeroPressing).

This will result in a double espresso. To make an Americano, simply top off the mug with hot water, or add hot milk for a creamy latte. The AeroPress can press from 1 to 4 scoops, and each scoop from the included AeroPress scoop makes the equivalent of a single espresso or 5 ounces of American coffee. Fill the chamber with hot water to the number corresponding to the number of scoops.

You can also make a full carafe of coffee using the AeroPress in less time than it takes to brew a pot of drip coffee. Two 3-scoop or 4-scoop pressing, topped off with hot water, will fill most vacuum carafes.

The AeroPress is the result of several years of applied research by inventor/engineer Alan Adler, who conducted numerous brewing experiments, measuring the brew with laboratory instruments. The experiments demonstrated that proper temperature, total immersion and rapid filtering were key to flavor excellence. He then designed and tested dozens of brewers before settling on the AeroPress design. Adler’s best-known invention is the Aerobie flying ring which set the Guinness World record for the world’s farthest throw (1,333 feet).

Make up · Tips and Tricks

Simple Morning Routine Hacks

Simple Morning Routine Hacks | lookingjoligood.wordpress.com I am not actually a huge fan of the word HACK, it reminds me of someone with pneumonia or bronchitis…anyway, now that I have grossed you out and ruined that word for you as well…
Anything that is going to make my life easier is a good thing! I love “life hacks”  

Now that I am working, I am no longer able to spend endless amounts of time getting ready in the morning.  I have a few tips and tricks to being able to get out of the house quickly.

  1. Do not wait until tomorrow morning to do what you can do the night before!!!
    I can not stress this point enough!  No matter how early I wake up in the morning it always seems as if the time flies by way faster than it does later in the day.  I always make our lunches the night before, but I also lay out all of our clothes (everything for every body: socks, undershirts, underwear and bra)  I also get my makeup and jewelry ready as well.
    I even go the the extent of putting my body and face lotion, toothbrush and paste out ready to be used.  In the morning, every second saved counts!  You will also sleep better knowing that you are prepared for the next morning.  Which brings me to my next point…Never put off until to morrow what you can do today -Thomas Jefferson | lookingjoligood.wordpress.com
  2. Do Not Hit The Snooze Button, Don’t Do It!!!
    When you are setting your alarm the night before, already have in your mind a determination that when your alarm goes off in the morning that is when you are going to get up and get up!
  3. Keep it simple!
    I love to do all kinds of different makeup looks, I like to experiment and see what works and what doesn’t.  Early in the morning before work is not the time to try new looks and products!  I also get easily distracted.  Knowing this about myself, I have a container that I keep all of my daily makeup essentials.  I have one BB cream, one face powder, one blush, one neutral eyeshadow quad (I use this for my brows as well), one eyeliner, one mascara, one lipgloss and one of each type of necessary brush/applicator for each of these products.
    This little box of makeup essentials has saved me so much time!  Not only am I not searching through all of my makeup, I am also not distracted by all the possible looks that I could create.
  4. Keep a grab and go bag!
    Lets face it, some morning things just don’t work out the way you have them planned.  Even some of the most planned and prepared for days can go wrong.  For those such days, I have a “Grab and Go Bag”.  In my grab and go bag I have my absolutely essential morning supplies: tinted lipgloss, mascara, blush, brow pencil, and pressed powder.
    An easy way to look pulled together when you are actually a crazy mess is to accessorize!  I also keep a pair of neutral earrings, a bracelet/watch,  and a neutral scarf in this bag.   No one who is running late has time to stop and put on earrings and a scarf, right?!  But if you have these things in an easy to grab bag, you can look put together even when you are not. Then, when things calm down and you aren’t as rushed you can take a bit of time to freshen up.  Don’t forget to return your earrings, watch, and scarf back back into your grab and go bag for the next time you are rushing out the door.

Hope you find these simple tips and tricks helpful for your morning routine!

lookingjoligood.wordpress.com

Delicious Recipes

Slow Cooker Beef Stew

As you may remember I had I posted about meal planning and using my crock pot to make Seven Days of Clean Eating Slow-Cooker Recipes.  Here is another one of the recipes that we really enjoyed…

Slow Cooker Beef Stew | lookingjoligood.wordpress.comSlow Cooker Beef Stew

Serves 4 Ingredients

● 1 tsp salt
● 1 tsp black pepper
● 2 1/2 lbs boneless beef chuck roast, cut into 1″ cubes
● 1/2 cup red wine *optional*
● 1 cup beef broth
● 3 Tbsp tomato paste
● 1 yellow onion, diced
● 2 cups sliced mushrooms
● 3 carrots, chopped
● 1 tsp dried rosemary
● 1 tsp dried thyme
● 2 whole bay leaves
● 1/3 cup fresh Italian parsley, minced
● 3-4 garlic cloves, minced or pressed
● 1 healthy pinch of red pepper flakes
*you can add diced potatoes too*

Directions:
1. Cut beef into 1-inch pieces and season with salt and pepper. Place in slow cooker.
2. In a small bowl whisk tomato paste into the beef broth. Pour over beef along with the wine.
3. Add carrots, onion and mushrooms along with garlic and remaining seasonings.
4. Give the ingredients a good stir, cover and cook on low 4-6 hours or on high 2-3 hours. It’s done when the meat is cooked through and the veggies are tender. Remove bay leaves before serving. Garnish with fresh parsley if desired.

lookingjoligood.wordpress.com

Flab to FAB · Health/ Fitness · Quote

Always Be What You’ve Always Been

always be what you've been always do what you've always done. | lookingjoligood.wordpress.comThis little saying goes both ways, good and bad.  If you always brush and floss your teeth, you will have good dental hygiene and a healthy mouth, that is good.  If you always stay up too late every night you will wake up tired and dragging the next morning, that is bad.

If you want something in your life to change, you have to try something different.

lookingjoligood.wordpress.com