Let’s face it, about this time of year, if you live in the North East like I do you are probably a bit Vitamin D deficient! While I can’t help you with that, I can give you a few tips on how to look like you have just returned from a stay at the beach.
Adding life to your face can be as simple as using bronzer!
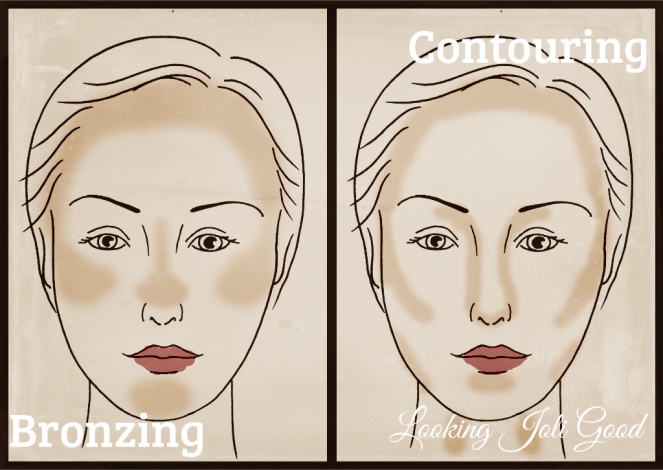
While using bronzer to add color is a simple step, proper application isn’t always as simple. Keep in mind that the goal is to add color, but not to give the appearance of an all over tan. Bronzer should be applied where the sun would naturally hit the face, the forehead, the cheeks, and the nose.
Bronzer is applied after your foundation and concealer have been put on. Choose a bronzer that works with you skin tone. To apply find the apple of the cheek by smiling and lightly dust your cheeks with the bronzer. Then using a wide brush blend up and blend down. You can put blush on top of it and even a little bit of shimmer and highlight on top as well.
Don’t confuse bronzing your face with contouring. These are two different techniques.
While bronzer is probably the quickest way to add some color and life to your face, a little bronzer can go a long way, remember that you can always add more, so start off lightly and build it up as needed.
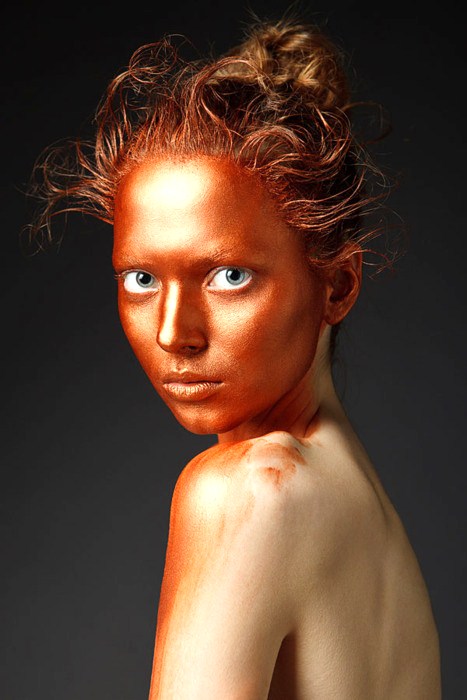
This is not the effect you are wanting to achieve with bronzer! (This is not my photo, I just googled bronzer overload and this was one of the first pictures that came up. )
Lining the inner rim of the eye is beautiful but it is a bit high maintenance. Unfortunately, you will always have to touch it up as needed throughout the day, but there are a few ways to extend the wear time of the eye liner when lining the water line or tight lining. First of all, always use a waterproof liner in the waterline. (My all time favorite is Scandaleyes waterproof kohl liner by Rimmel.) Secondly, before applying the liner, use a q-tip cotton swab to dry off the area you are about to line. Q-tips are perfect for using throughout the day as well to clean up the buildup that often collects in the tear ducts. (I hate when that happens!) Thirdly, if you tend to have very watery eyes, you may want skip lining the waterline all together, but if not, apply the liner to your waterline with your head tilted back with your mouth closed while breathing deeply through your nose. This helps those tears to go into the sinuses and not out onto the eyes and down the cheeks.
Let me know if you try out this tip and if it works for you!
I recently read this article from Real Simple and thought that this was an interesting article. I wanted to share it with all of you! What do you think? Do you agree with these tips on where to scrimp and where to splurge? PS: I don’t necessarily agree with all of these, but I do think that it is an interesting take on where to spend and where to save.
If you would like to read the original article click HERE
7 Beauty Products Worth Splurging On (and 5 That Totally Aren’t)
“Admit it: The exotic list of ingredients and the promise of supermodel shine are tempting. But then you hear a little voice in your head (hey, is that you, Mom?) saying, “It’s hype! You’re paying for a pretty box.” Some products are worth every dime; some not so much. How to tell the difference.
Shampoo = Scrimp
Springing for extravagant shampoo is essentially like watching your money go down the drain with the suds. However, if you’ve spent a small fortune coloring or highlighting your hair, you might want to go with the product that your hairstylist recommends.
Photo by Serge Bloch from the Real Simple Website
Conditioner = Splurge
Yes, you rinse conditioner out, but these products are emulsions, which means they contain an oil or wax that doesn’t mix with water. So whatever healthy ingredients are in them adhere to the hair and don’t wash away.
Cleanser = Scrimp Because the fancy-pants ingredients will be on your face for only two seconds—not long enough to be worth the expense. Have acne-prone or sensitive skin? Look for labels that say “gentle” or “noncomedogenic.”
Day cream = Scrimp Make sure it’s the kind with sunscreen included; it should have broad-spectrum protection of at least SPF 15. You’ll find an aisle full of worthy options at the drugstore.
Foundation = Splurge Since the chances that your face may end up looking like an Oompa Loompa are high. Instead head to the department-store cosmetics counters, where you can try out not only shades but also formulas before you buy. Do you prefer lightweight and sheer? Or something with more coverage to hide acne?
Powder = Splurge Unless you opt for a colorless translucent powder (in which case, you can totally go thrifty), you’ll want to try this on before you buy, especially if you’re using powder as an all-purpose foundation/ concealer/makeup setter. A well-made one also gives you that flawless, practically Photoshopped look and will last longer, so you won’t need to apply as much of it.
Powder blush = Splurge The pigments in blush are very similar to those in eye shadow. The less expensive the product, the more likely it is that the pigments have been diluted with talc and other powder ingredients. Also, cheaper blushes have a tendency to leave streaks.
Eyeliner = Splurge You don’t want one with a crumbly tip that creates a shaky line. Generally, the more expensive the pencil, the softer the wax and the smoother the application.
Eye shadow = Splurge Department-store–brand shadows adhere to the lids better, go on smoother, and offer richer colors than their drugstore counterparts. Certain pigments, such as deep blues and purples, are expensive, so companies that charge more can use more of them. But if you want to test-drive trendy shades, then, by all means, go economical.
Mascara = Scrimp Bombshell: There isn’t a lot of difference between high-end and low-end formulas. Because bacteria grow easily in mascara, you should trash a tube after three months—which is all the more reason to cut corners.
Lip gloss = Scrimp No need to go all out if you want just a hint of tint and a bit of shine. And who are we kidding? Half of it will rub off on your coffee cup anyway.
Lipstick = Splurge If it’s your signature shade, don’t cheap out. You’ll get a creamier texture and possibly even extracts or vitamins that will prevent your pucker from becoming caked and flaky.
You know I love me some makeup! But there is so much more to “looking (and feeling) Joli good” than just what we put on our faces every day.
What is a diet? Whether you are consciously on a “weight loss diet”or not, you still have a diet. A diet can easily be explained as the “set of food rules that you follow for yourself.” Most of us seem to want weight loss at one point or another in our lives. Is there a magic food formula? Unfortunately, still NO! We are not all genetically the same, so what is right for one person is not necessarily best for someone else.
While obesity is a major factor in a lot of diseases, it is better to focus on health at every size. Health should not just be a weight goal, but a lifestyle: lots of physical activity, regular meals, good social support. Instead of just focusing on weight loss, focusing on healthy outcomes such as less cancer, heart disease, and longer life with better quality.
Active obese people tend to live longer than skinny sedentary people.
Losing weight, while it is not easy, isn’t actually the hardest part. Maintaining that weight loss is trickier. Overly restrictive diets are hard to maintain. I am not saying that you have to change everything about your current diet, but sometimes just making small changes here and there make big differenced in the long run.
Studies have shown that something as simple as keeping track of your weight on a consistent basis helps with weight loss. As well, keeping a food journal can actually double your overall weight loss! I write down everything I eat, whether good or bad to keep myself accountable and aware of what I am actually eating. I think this is the #1 thing that has helped me to lose weight and I am hoping it will help me to maintain this weight loss in the future.
Think more about what is healthy to eat instead of all of what you should not be eating.
Most of us don’t overeat because we are hungry, we over eat because we are in the habit of overeating. Some times simple changes like putting the cookies and snacks away in the closet and instead having fruit and veggies easily accessible can make healthy dietary choices easier without being overly conscious of the change.
Moderation: less meat, more veggies, having fruit for dessert and skipping processed foods.
Also, leave room for flexibility! Make good choices 80% of the time and let yourself have a bit of indulge every once in a while. Healthy is a longterm lifestyle, not a short term quick fix.
Consistency is more important than perfection!
The first time I watched this video by Dr Mike Evens I started taking notes! I love the way that the vastness and confusion of “healthy eating” and “diets” is broken down into smaller bites (pun totally intended. :-))
Please take 15 minutes out of your busy day to watch this video!
“Dr. Mike Evans is a staff physician at St. Michael’s Hospital and an Associate Professor of Family Medicine. He is a Scientist at the Li Ka Shing Knowledge Institute and has an endowed Chair in Patient Engagement and Childhood Nutrition at the University of Toronto.
Written, Narrated and Produced by Dr. Mike Evans Illustrations by Liisa Sorsa Directed, Photographed and Produced by Nick de Pencier Editor, David Schmidt Story/Graphic Facilitator, Disa Kauk Production Assistant, Chris Niesing Director of Operations, Mike Heinrich”
You can also check out the other interesting health information he has on his website by clicking HERE.
I know I personally feel so much better overall when I eat healthier, not just physically but mentally as well. What do you think about overall health over weight?
If you would like to read more about my journey from flab to fab click HERE.
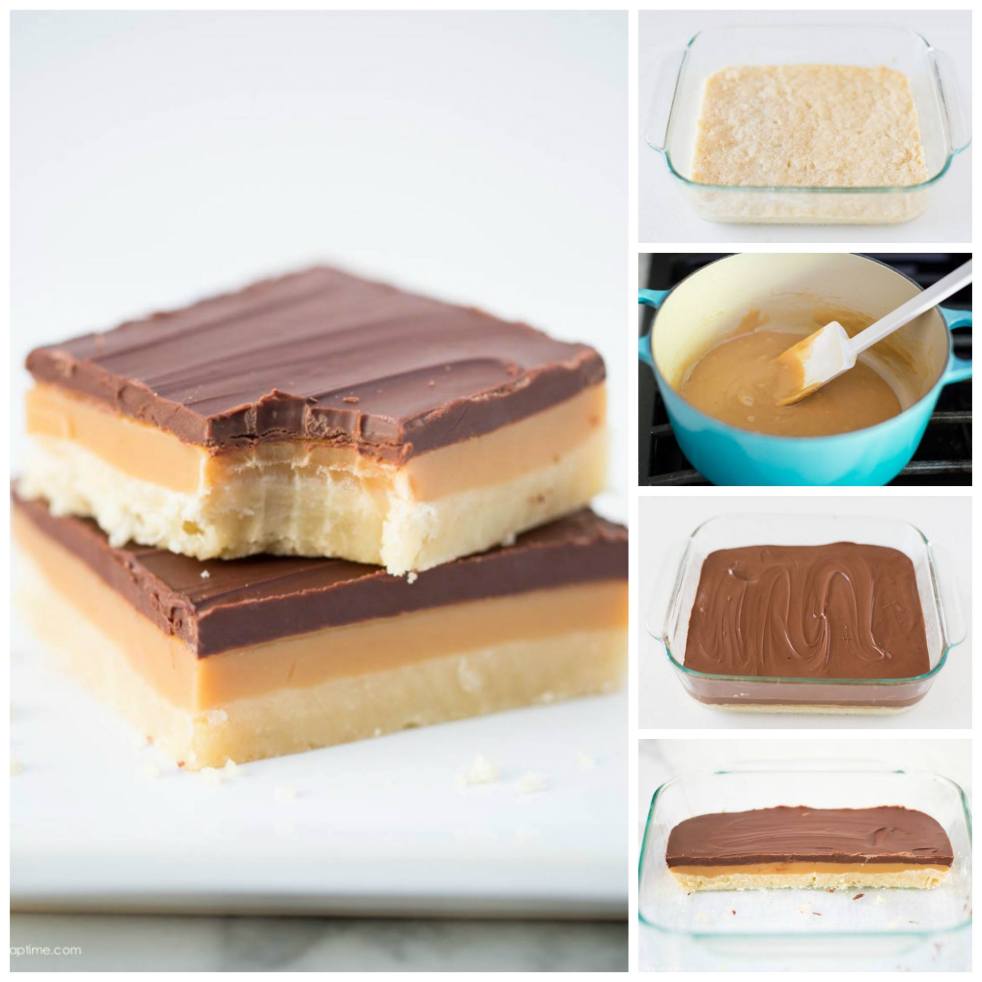
Preheat the oven to 350ºF. Line a 9×9 pan with parchment paper or spray with non-stick cooking spray. Set aside.
Combine the flour and sugar in a medium size bowl. Then cut the butter in with a pastry cutter or two forks, until it forms a crumb mixture. Then press down into the pan and bake for 20 minutes. Remove from oven and allow to cool.
For the caramel add the butter to a medium saucepan and melt over medium heat. Stir in the brown sugar, corn syrup, and sweetened condensed milk. Bring to a boil and cook for 5 minutes, stirring constantly. Remove from heat and stir an additional 2 minutes, or until it starts to thicken. Pour over cooled shortbread bars. Allow to cool.
Once the caramel has become firm, mix the chocolate and oil in a microwave safe bowl. Cook on high for 1 minute. Stir and cook in 15 second intervals, until the chocolate is melted. Then pour over the caramel layer and allow to set. May place in the fridge to help set faster.
Once the chocolate has hardened, cut into squares with a warm knife.
Go check out all the other awesome recipes at I Heart Naptime!
Sometime making little changes can make a big difference in you makeup/beauty routine.
Here is another tip for Tip Tuesdays…
When applying eyeshadow into the crease, instead of looking straight on into the mirror, tilt your head back and look down into the mirror. Just moving your head into this different position will help you to visualize the eye bone better giving you a better guide where to add your crease color.
This tip is also helpful for when you are applying eyeliner as well as false lashes. You can better visualize where you want to add the liner and the lashes by tilting your head back and looking into the mirror at this different angle.
If you try out this tip, I’d love to hear how it works for you!
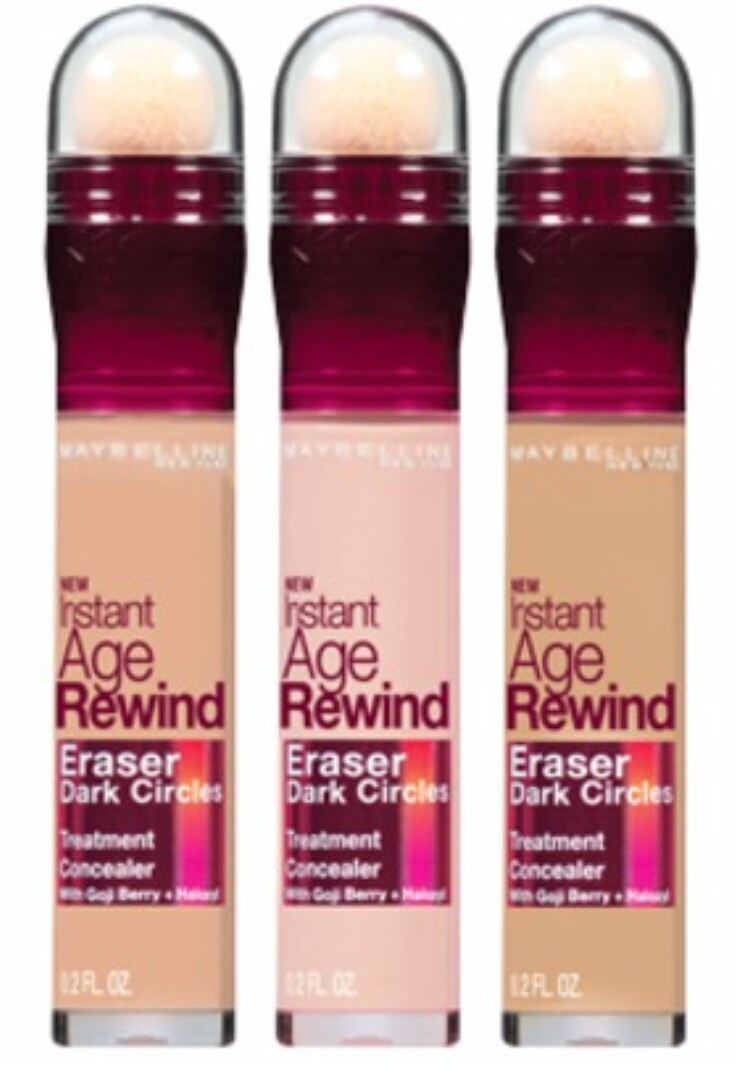
~Weekly Product Highlight~ Instant Age Rewind Eraser Dark Circle Treatment Concealer~
After seeing so many beauty YouTubes recommend this Instant Age Rewind Eraser Dark Circle Treatment Concealer by Maybelline, I figured I had to at least give it a try, and I am so glad that I did!
I absolutely love this Instant Age Rewind Eraser Dark Circle Treatment Concealer. It covers and blends so beautifully. I have tried a lot of concealers, and this is the best so far. It gives me the perfect amount of coverage. It does not crease, goes on smoothly and doesn’t leave that white shadow that I hate that some concealers leave. Also,when and if I decide to bring it down into a triangle onto my face, it doesn’t seep into my pores or fine lines.
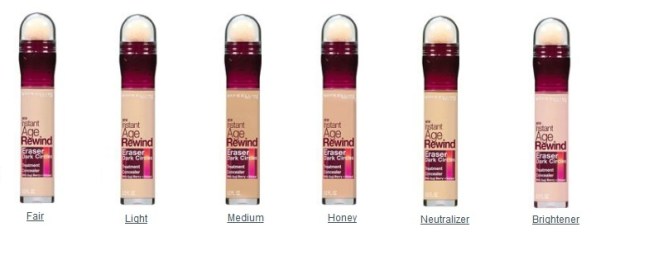
It comes in 6 different shades. Fair, Light, Medium, Honey, Neutralizer, and Brightener. My favorite so far is 160 Brightener.
One downfall I’ve noticed is that it seems to wear off a little quicker than I would like. Although, when set with a finely milled under eye powder it seems to last much better. Also, when necessary, it can be reapplied without causing too much caking or creasing. Another downfall is that despite having 6 shades, none are really great for darker skin.
I love the design of the packaging. Since most concealers have a doe foot applicator, it is quite a different application experience from the other concealers that I have used. Also because of the design of the packaging, it is easier to not go overboard and apply too much. A little bit does go a long way (another added bonus.)
The Ulta Website give a great description of the way to use it…(which can also be found on the back of the package it comes in.)
“Turn collar of the micro-corrector applicator in direction of arrows until product is visible on sponge. This may require a number of turns. Adjust accordingly for desired amount of product. Using applicator, apply concealer directly to under-eye area, blending in an outward motion. To apply more, twist collar of applicator 1-2 clicks at a time. For best results, use sparingly. For extreme dark circles, apply the neutralizer shade underneath your concealer shade. Use the brightener shade to add a luminous touch to inner corner of eyes, cheek and brow bones and bridge of nose.”
(ps: I don’t know why, but I love the word sparingly, lol!)
“Active Formula and Micro-Corrector Applicator erase dark circles, puffiness and fine lines instantly.
Why You’ll Love It
• Micro-Corrector Applicator micro-fills and smoothes. • Active formula with Haloxyl reduces the look of puffiness and shadows while fading the appearance of under-eye circles. • Apply neutralizer shade for extreme dark circles. • Brightener shade adds a luminous touch.
For Best Results
Use applicator to apply concealer directly to under-eye area, blending in an outward motion. Wipe off excess eye concealer with dry tissue only. Do not wet applicator.”
Have you ever used this Instant Age Rewind Eraser Dark Circle Treatment Concealer? What do you think? Which shade is your favorite? Let me know in the comment section!
What will you need? Good supportive athletic shoes, that’s it.
No warm up for this workout, it starts right up with the circuit. Each of the fourteen parts is done for 30 seconds and repeated through twice for a total of three times.
Workout: 1. Jumprope 2. Butt Kicks 3. High Knees 4.Alternating Knee Strikes 5. Jumping Jacks 6. Fast Feet 7. Skiers 8. Skaters 9. Plié Hops 10. Cross Jacks 11.Upper Cuts 12. Towel Runs Right then Left 13. Hooks Right then Left 14. Burpees (I HATE burpees, but then again, who doesn’t.)
Repeat twice.
Cool Down/Stretches
I love this workout. I think that because each of the moves only lasts for 30 seconds it is much more tolerable and enjoyable!
Here is one of my very favorite Jillian Micheals quotes:
“Many are so preoccupied with what others think it defines their existence. When we fixate externally, it keeps us from truly knowing ourselves and our destiny. Most [people] fear looking inward for worry they won’t find greatness, but when you stop allowing others to define your worth, you’ll see—greatness exists in us all, waiting to be expressed”
Initially, I found Jillian Michaels’ approach to exercise and dieting highly motivational. Her intense workouts and strict dietary guidelines pushed me to achieve remarkable physical results, which fueled my motivation and determination. I embraced her no-nonsense attitude and believed that pushing my body to its limits was the only way to achieve success. However, as time went on, I began to realize that this approach was taking a toll on my mental health. The relentless pursuit of physical perfection and the constant pressure I placed on myself led to feelings of anxiety, guilt, and a distorted body image. It was then that I decided to change my perspective and adopt a more balanced and loving approach to my body. By prioritizing self-compassion, listening to my body’s needs, and embracing acceptance, I discovered a newfound sense of mental well-being. This shift in thinking allowed me to find joy in movement, cultivate a positive relationship with my body, and ultimately, achieve a healthier and more sustainable approach to overall well-being.
All food is not created equal. Unfortunately the two hundred calories from a Little Debbie Snack Cake are not equal to the 200 calories in steamed veggies. I really wish that this was not true! I really wish that my body would use the calories from desserts the same way it uses the veggies.
Despite having met my goal weight, I still have good days and bad days. Some days I want to eat an entire bag of skittles all by myself…the big bag, while other days I will stick to my healthy food plan no problem. The important thing is that I don’t let the mess up days keep me from being successful the next time.
I love them all, but the green ones are probably my favorite closely followed by the red ones.
I saw this video a while back and I love how it shows the comparison between the different foods. It perfectly shows how equal doesn’t mean equal!
Thank you for continuing to journey with me from flab to fab! If you would like to read more posts about this journey click HERE!
Makeup is so much fun and it is such a personal thing. There is no right or wrong way to do it. I’ve created this “Make Me Up Tag” for a fun way to share what you do. So, that being said, I’m wondering do you…and why?
I’d love for you to share the “Make Me Up Tag”
Primer or no primer?
Concealer before or after foundation?
Eyes or foundation first?
Brush, beauty blender, or fingers to apply your foundation?
Matte or dewy finish?
Do you curl your eyelashes with an eyelash curler?
Do you wear false lashes or only your natural lashes?
Waterproof or regular mascara?
Liquid, gel, or kohl eyeliner?
Matte or glossy lips?
Natural of false nails?
Here are my answers…
Primer or no primer? depends on the day and which foundation/BB cream I am wearing
Concealer before or after foundation? After
Eyes or foundation first? Foundation first
Brush, beauty blender (sponge), or fingers to apply your foundation? Fingers first then beauty sponge
Matte or dewy finish? Matte
Do you curl your eyelashes with an eyelash curler? I always have to curl my eyelashes! They are so sad and straight!
Do you wear false lashes or only your natural lashes? I love the way that false lashes look, but I have never worn them myself
Waterproof or regular mascara? Always waterproof due to the straight lashes
Liquid, gel, or kohl eyeliner? Usually I wear kohl liner.
Matte or glossy lips? Glossy
Natural of false nails? Natural not even polished.