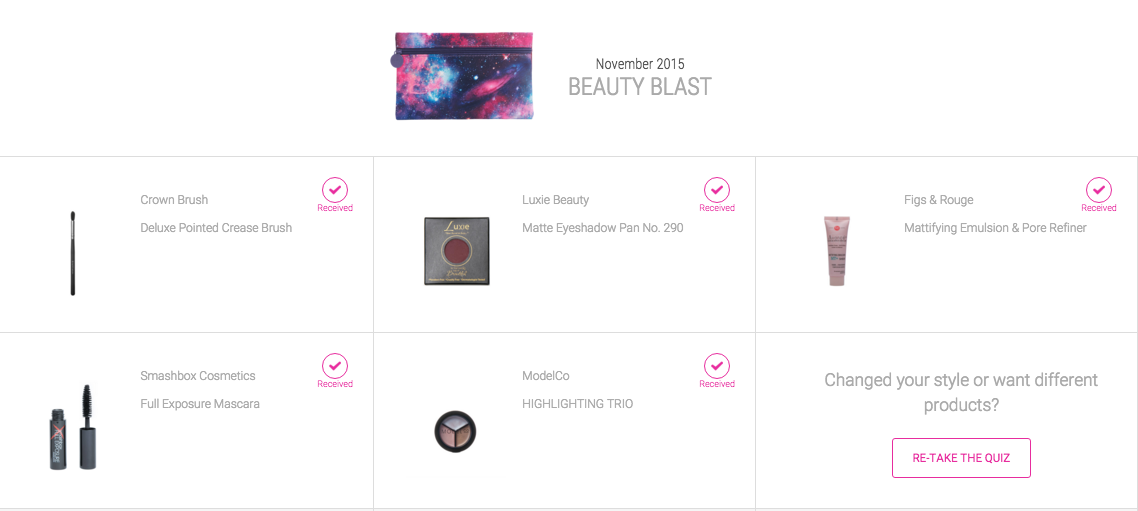
I can’t believe that another month has flown by and it is already time to receive another ipsy glam bag! If you don’t know what ipsy is you can check out my previous post all about it by clicking HERE
Smashbox Cosmetics Full Exposure Mascara I have already used this a few times. I was pretty excited about getting it in my glam bag, but after using it, I am only meh about it. You know how some mascaras can get better after a little while, so I will keep using it and see if I like it more after a week or so.
ModelCo HIGHLIGHTING TRIO This highlighting trio is very smooth and creamy. I think that I will probably use it on my eyes instead.
Overall I am really pleased with this month’s glam bag. I prefer to get makeup instead of nail polish or skincare.
How about you? Did you get an ipsy’s glam bag? What did you get in yours? Were you happy with your samples? Do you get any other monthly subscription bags/boxes that are worth trying out? Let me know in the comments below.
If you don’t already subscribe and would like to try out ipsy you can use my referral link by clicking HERE! Also, if you are interested in seeing my other recent posts about ipsy click HERE
Went to Target to pick up one thing and $150 later…I discovered that both Wet n Wild Beauty and NYC Cosmetics were on sale. Of course, I picked up a few things to try out.
I have used this NYC BB cream before, and I think I remember liking it. For only $4 and 10% off, I figured it’s worth trying out again either way.
I love my Wet and Wild Petal Pusher palette, so I am going to give the Comfortzone palette a try. Plus I have heard so many people on YouTube recommend it.
I am a cream lipsticks kind if gal, I am not into matte lips at all. For less than $2, I am hoping that this NYC lipstick in Sugar Plum will be a winner.
Have any of you ever tired these NYC eye-shadows sticks? I have one from Milani and I really like it. Lately I have been using that one as an eye-shadows base, but since it is such a beautiful color, I don’t want to use it all up just as a base. I am hoping these neutral ones from NYC will work as well.
Good Morning! Just like most people, I love Fridays! I hope that you are having a wonderful day so far. I really appreciate you following my blog, and would love for you to follow me in other places as well. Click below to open the social media of your choice…
Please, leave me a comment if you do follow me so that I can also follow you as well!
Shrimp Scampi is one of those dishes that is really easy to make, yet taste so delicious that it seems as if it might be tricky. Here is a quick and easy recipe…
Prep time: less than 10 minutes
Cook time:5 minutes
Yield:Serves 4
Ingredients
1 pound large (16-20 count) raw shrimp, shelled and de-veined**
2 Tbsp olive oil
2-3 Tbsp butter
Salt
1 Tbsp minced garlic (or 3-4 garlic cloves)
1/3 teaspoon red pepper flakes (to taste)
1/2 cup white wine
2 tablespoons finely chopped parsley
Freshly ground black pepper to taste
1 Tbsp lemon juice
**You can use frozen raw shrimp, just defrost them quickly (and safely) by putting the shrimp in a large bowl of salted ice water about 1 1/2 teaspoons of salt for every quart of water.
Directions
1 Heat a sauté pan on high heat then decrease to medium high heat. Swirl the butter and olive oil in the pan until the butter is melted. Stir in the garlic and red pepper flakes.
2 Sauté the garlic for just until it begins to brown at the edges.
3 Add the shrimp, and then the wine. Stir coating the shrimp with the butter, oil, and wine. Keep the shrimp in an even layer in the pan. Increase the heat to high and boil the wine for two to three minutes.
4 Turn the shrimp over to be sure to cook evenly on both sides. Continue to cook on high heat for another minute.
5 Remove the pan from the heat.
6 Sprinkle the shrimp with parsley, lemon juice, and black pepper.
7 Serve over your choice or pasta (my favorite is angel hair!)
About a year ago, my husband got me Jillian Michaels’ Body Revolution. I love Jillian’s work outs! She is by far my favorite!
I had almost completed the 12 week program, when at week 11, while on vacation, I injured my left abductor thigh muscle, (totally unrelated to the program). That injury was a major 4 month set back, and actually I sadly never returned to the program to complete it. That is until yesterday…
I started back at week one. It starts off easy enough, especially since I exercise on a regular basis, it almost seems to be too simple for a Jillian workout. (I have already done all the workouts, so I know it gets a lot harder!) So as “simple” as it seemed, let me just say, right now I am sore in places that I forgot existed.
As I complete the program, I will be giving a more detailed review with all the information that I was looking for when I was researching this workout program a year ago. As for right now, I need to go stretch out my sore muscles.
While this isn’t my usual type of makeup Weekly Product Highlight it is a product I love and I want to highlight it 🙂
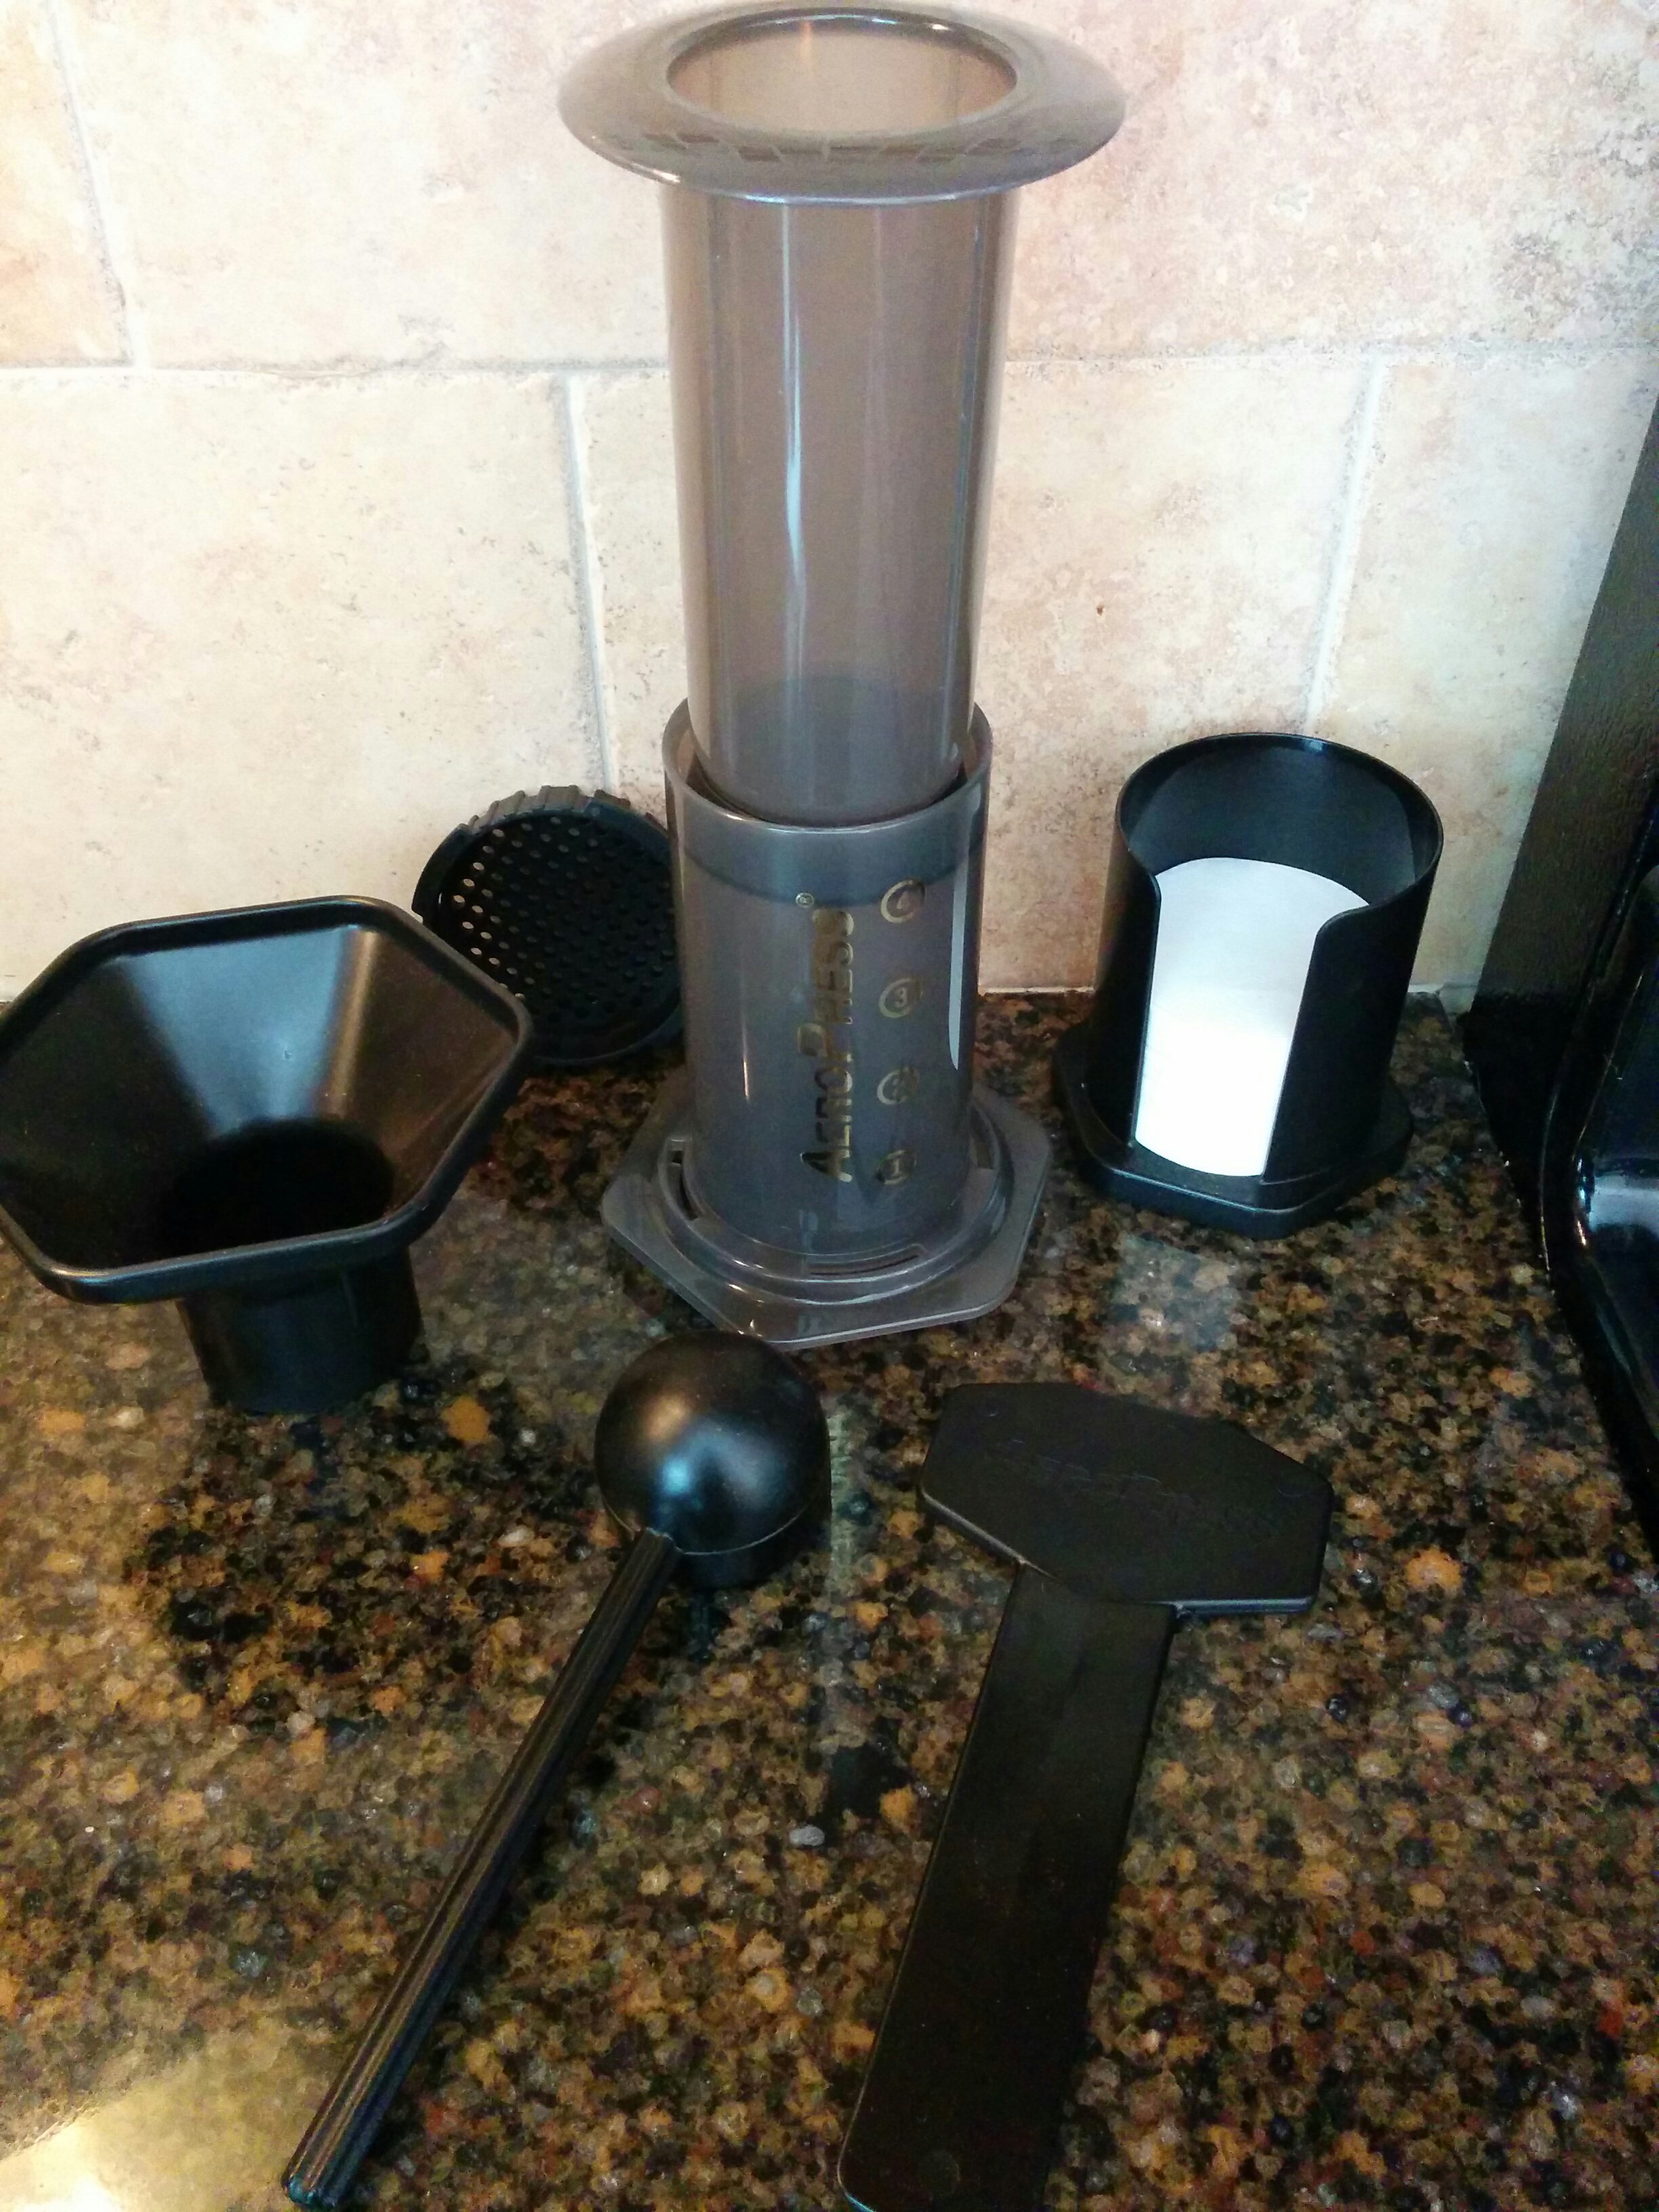
My Aero Press Coffee Maker
Are you a coffee drinker? Up until about 6 months ago, I would have said “Not me, no way, I never drink coffee!” Then I slowly started to drink coffee and it has all been down hill since then, haha, just kidding. I do enjoy drinking coffee now. I am not one to go to a drive-thru, so I needed to learn how to make my own coffee. I also didn’t want to get another appliance to take up room on my already limited kitchen counter space.
My husband suggested that I try out an Aero Press. I am not going to lie, I made several really bad cups of coffee before figuring out what worked best for my taste, after some trial and error, I have been loving my new coffee maker.
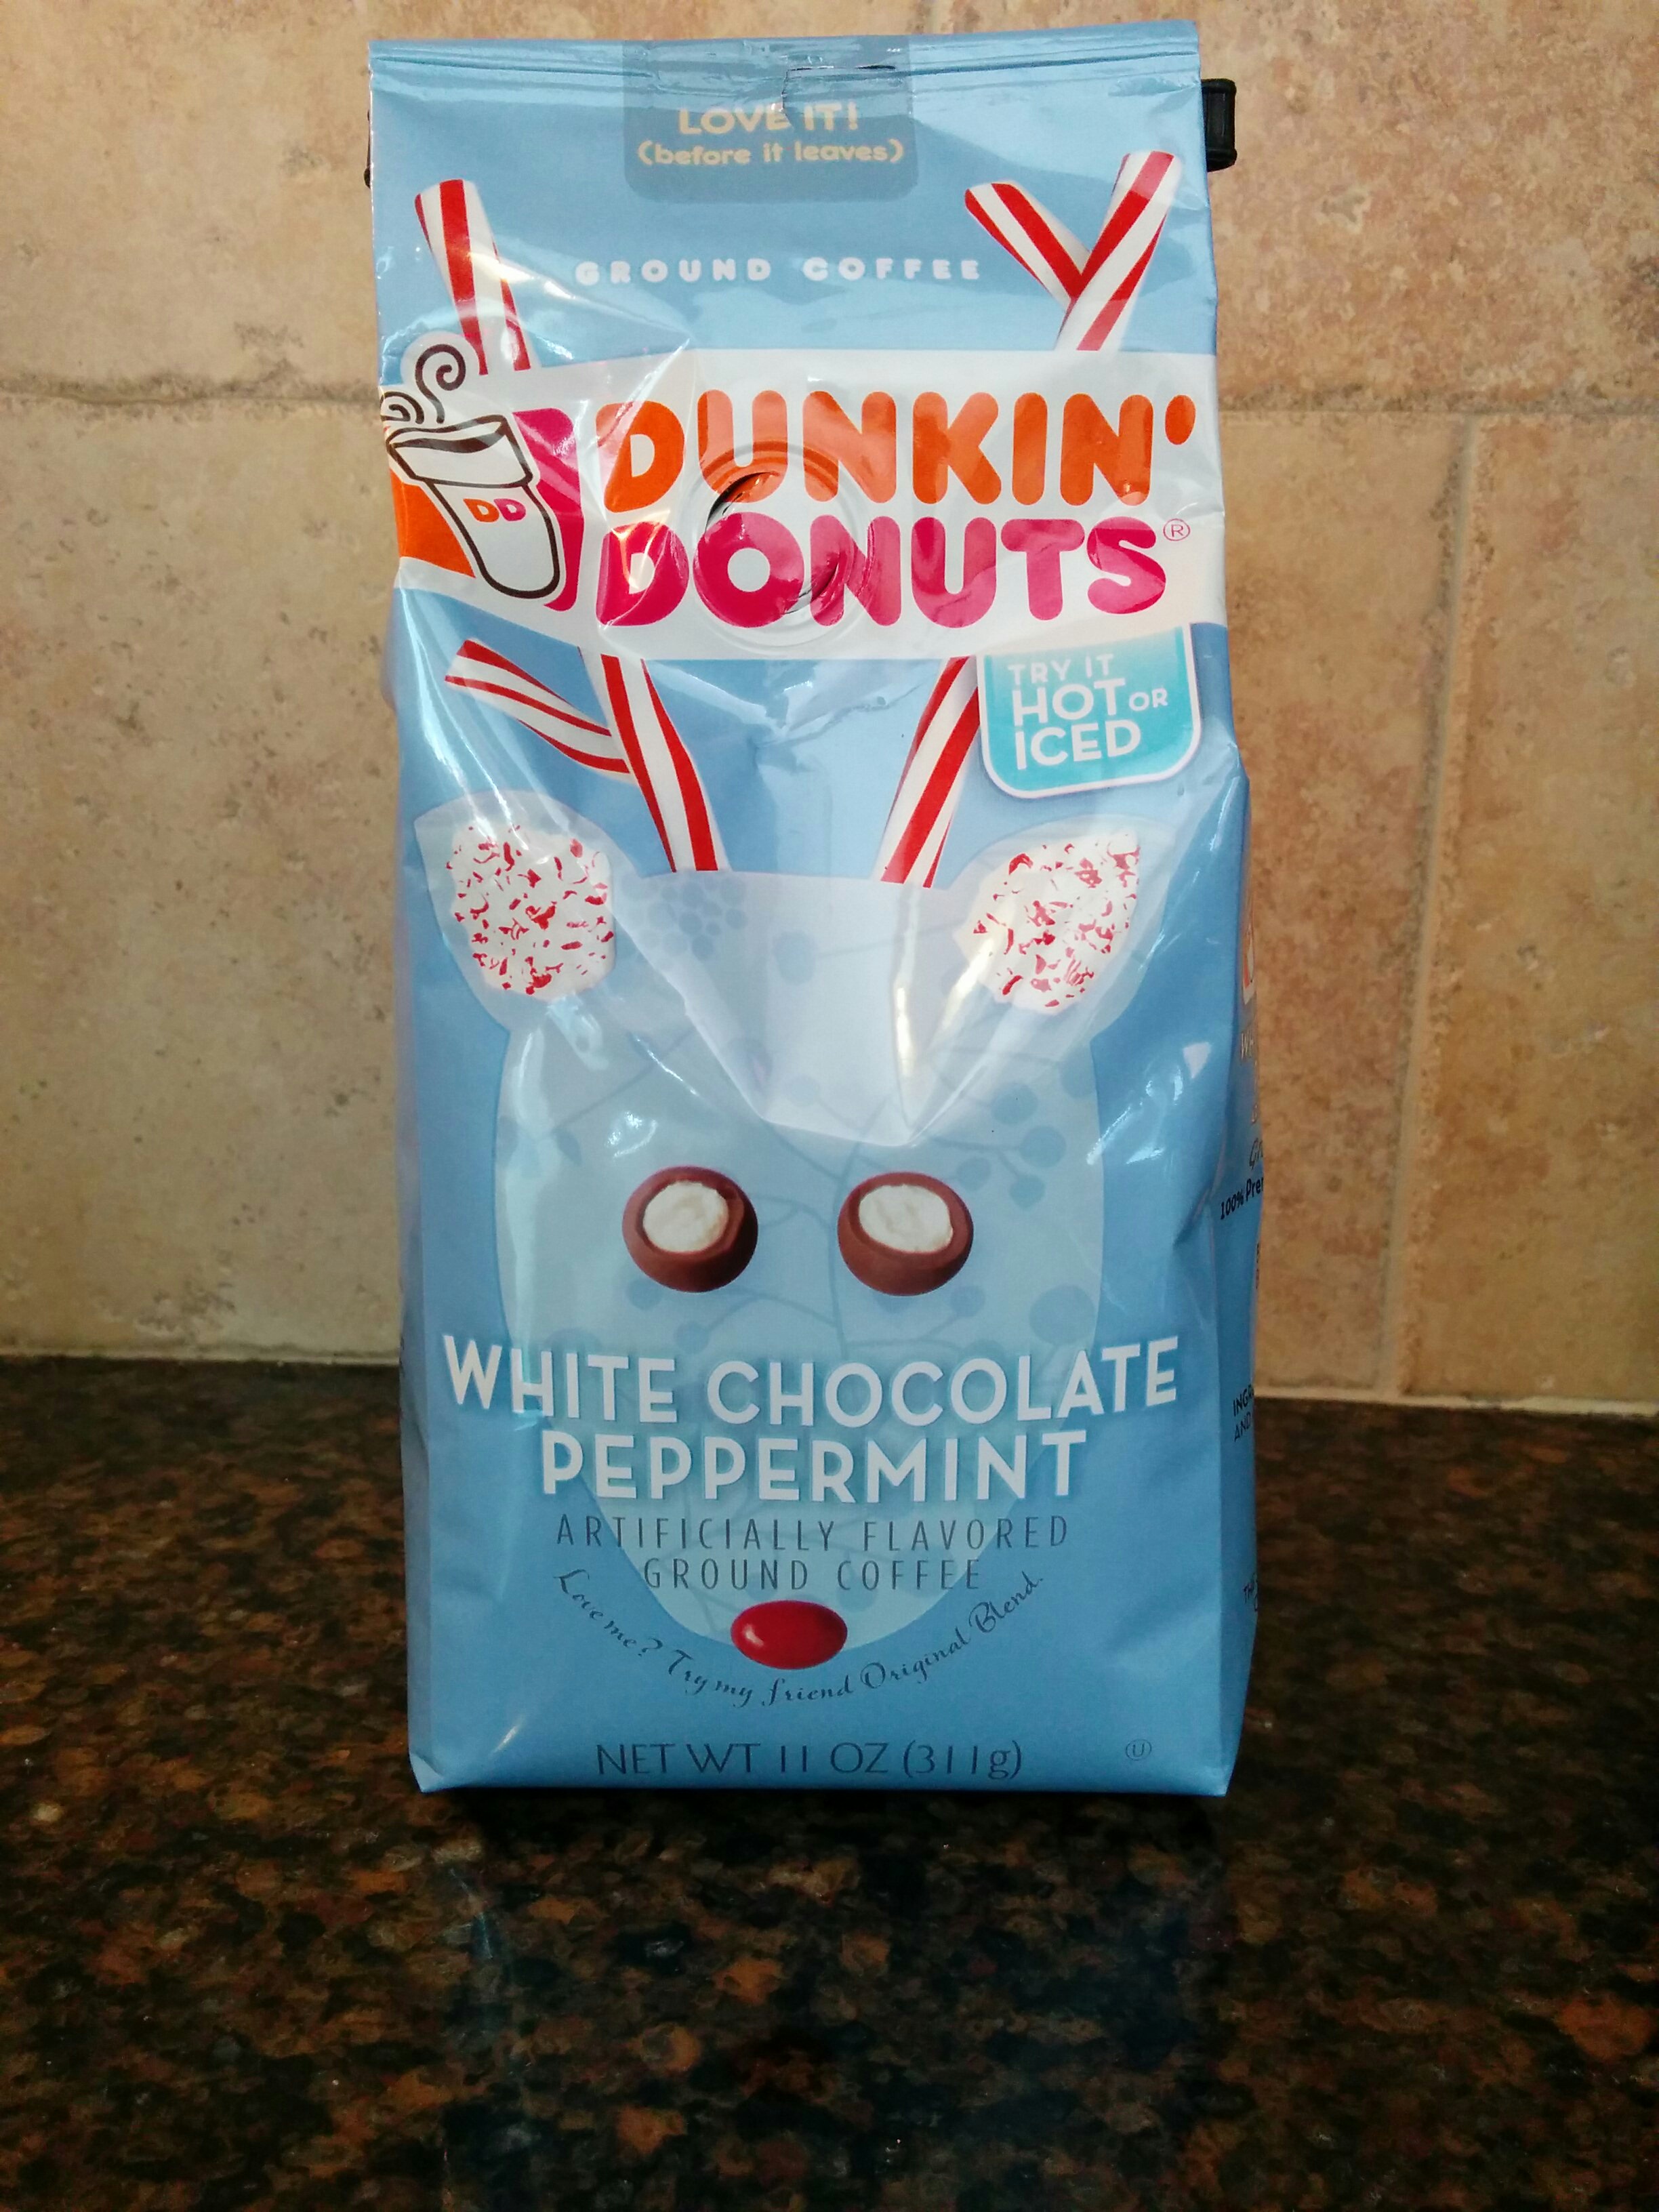
While I don’t think that it really tastes like white chocolate or peppermint, this Dunkin Donuts coffee is very good!!!!
If you don’t have a coffee maker already I definitely recommend this one. It takes up minimal space and is very easy to use. I have found that using a finely ground coffee works best, as well as adding a pinch of salt takes away the natural bitterness of some coffees. I like my coffee super strong, so I weigh out 26 grams of coffee grounds, then cover them with 185 degree water. I swirl the water/coffee ground mixture for 15 seconds. I then add 185 degree water up to almost the top of the press and let it rest for 45 seconds. During this time I put the filter into the cap and wet the filter with the 185 degree water. Once the 45 seconds is up, I put the cap on, flip the press over onto the top of my mug and slowly but consistently press the coffee out. When a rush of air is heard, that means that the good part of the coffee is in the mug. Discard the grounds and enjoy your cup of coffee. (I add 185 degree water to my mug to make a full 8 oz of coffee.)
While I got mine from Amazon, they can also be bought at Crate and Barrel and Kohls as well as other places that sell home goods.
Fast and convenient, the AeroPress Coffee and Espresso Maker makes one of the best cups of coffee you’ll ever taste. This innovative uses the ideal water temperature and gentle air pressure brewing to produce coffee and espresso that has rich flavor with lower acidity and without bitterness. It makes 1 to 4 cups of coffee or espresso (enough for 1 or 2 mugs), features a micro filtered for grit free coffee, and takes just 1 minute to make coffee (actualpress time takes only 20 seconds).
To brew a double espresso or 10-ounce cup of coffee:
Place a microfilter in the bottom cap of the AeroPress chamber and twist the cap tightly closed.
Place two scoops of ground coffee from the included AeroPress scoop into the chamber.
Stand the chamber on a sturdy mug, then proceed to pour hot water into the top of the chamber (175 degrees F is optimal).
Stir the water and coffee with the included paddle for about 10 seconds.
Insert the plunger into the chamber and gently press down about a quarter of an inch and continue to maintain that pressure for 20 to 30 seconds (gentle pressure is the key to easy AeroPressing).
This will result in a double espresso. To make an Americano, simply top off the mug with hot water, or add hot milk for a creamy latte. The AeroPress can press from 1 to 4 scoops, and each scoop from the included AeroPress scoop makes the equivalent of a single espresso or 5 ounces of American coffee. Fill the chamber with hot water to the number corresponding to the number of scoops.
You can also make a full carafe of coffee using the AeroPress in less time than it takes to brew a pot of drip coffee. Two 3-scoop or 4-scoop pressing, topped off with hot water, will fill most vacuum carafes.
The AeroPress is the result of several years of applied research by inventor/engineer Alan Adler, who conducted numerous brewing experiments, measuring the brew with laboratory instruments. The experiments demonstrated that proper temperature, total immersion and rapid filtering were key to flavor excellence. He then designed and tested dozens of brewers before settling on the AeroPress design. Adler’s best-known invention is the Aerobie flying ring which set the Guinness World record for the world’s farthest throw (1,333 feet).
I am not actually a huge fan of the word HACK, it reminds me of someone with pneumonia or bronchitis…anyway, now that I have grossed you out and ruined that word for you as well…
Anything that is going to make my life easier is a good thing! I love “life hacks”
Now that I am working, I am no longer able to spend endless amounts of time getting ready in the morning. I have a few tips and tricks to being able to get out of the house quickly.
Do not wait until tomorrow morning to do what you can do the night before!!!
I can not stress this point enough! No matter how early I wake up in the morning it always seems as if the time flies by way faster than it does later in the day. I always make our lunches the night before, but I also lay out all of our clothes (everything for every body: socks, undershirts, underwear and bra) I also get my makeup and jewelry ready as well.
I even go the the extent of putting my body and face lotion, toothbrush and paste out ready to be used. In the morning, every second saved counts! You will also sleep better knowing that you are prepared for the next morning. Which brings me to my next point…
Do Not Hit The Snooze Button, Don’t Do It!!!
When you are setting your alarm the night before, already have in your mind a determination that when your alarm goes off in the morning that is when you are going to get up and get up!
Keep it simple!
I love to do all kinds of different makeup looks, I like to experiment and see what works and what doesn’t. Early in the morning before work is not the time to try new looks and products! I also get easily distracted. Knowing this about myself, I have a container that I keep all of my daily makeup essentials. I have one BB cream, one face powder, one blush, one neutral eyeshadow quad (I use this for my brows as well), one eyeliner, one mascara, one lipgloss and one of each type of necessary brush/applicator for each of these products.
This little box of makeup essentials has saved me so much time! Not only am I not searching through all of my makeup, I am also not distracted by all the possible looks that I could create.
Keep a grab and go bag! Lets face it, some morning things just don’t work out the way you have them planned. Even some of the most planned and prepared for days can go wrong. For those such days, I have a “Grab and Go Bag”. In my grab and go bag I have my absolutely essential morning supplies: tinted lipgloss, mascara, blush, brow pencil, and pressed powder.
An easy way to look pulled together when you are actually a crazy mess is to accessorize! I also keep a pair of neutral earrings, a bracelet/watch, and a neutral scarf in this bag. No one who is running late has time to stop and put on earrings and a scarf, right?! But if you have these things in an easy to grab bag, you can look put together even when you are not. Then, when things calm down and you aren’t as rushed you can take a bit of time to freshen up. Don’t forget to return your earrings, watch, and scarf back back into your grab and go bag for the next time you are rushing out the door.
Hope you find these simple tips and tricks helpful for your morning routine!
● 1 tsp salt
● 1 tsp black pepper
● 2 1/2 lbs boneless beef chuck roast, cut into 1″ cubes
● 1/2 cup red wine *optional*
● 1 cup beef broth
● 3 Tbsp tomato paste
● 1 yellow onion, diced
● 2 cups sliced mushrooms
● 3 carrots, chopped
● 1 tsp dried rosemary
● 1 tsp dried thyme
● 2 whole bay leaves
● 1/3 cup fresh Italian parsley, minced
● 3-4 garlic cloves, minced or pressed
● 1 healthy pinch of red pepper flakes
*you can add diced potatoes too*
Directions:
1. Cut beef into 1-inch pieces and season with salt and pepper. Place in slow cooker.
2. In a small bowl whisk tomato paste into the beef broth. Pour over beef along with the wine.
3. Add carrots, onion and mushrooms along with garlic and remaining seasonings.
4. Give the ingredients a good stir, cover and cook on low 4-6 hours or on high 2-3 hours. It’s done when the meat is cooked through and the veggies are tender. Remove bay leaves before serving. Garnish with fresh parsley if desired.


 Crown Brush Deluxe Pointed Crease Brush